Creating the data source
Adding the data source
By adding the Clockify data source to Kondado, you can access your data in your Data Warehouse or Data Lake – process also known as ETL or ELT
To add the Clockify data source, follow the steps below:
1) Log in to your Clockify account
Attention: The Clockify user used must have WORKSPACE_OWN or WORKSPACE_ADMIN permissions for the workspaces you want to replicate
2) Click on your profile picture in the left sidebar and then on “Profile settings”
3) In the API section you will find your API key (click on “Generate” if you don't have your API key yet). copy this value

4) Login to Kondado, go to the add data sources section and select the Clockify data source
5) On the data source data filling page, paste the value obtained in step (3) in “API key”
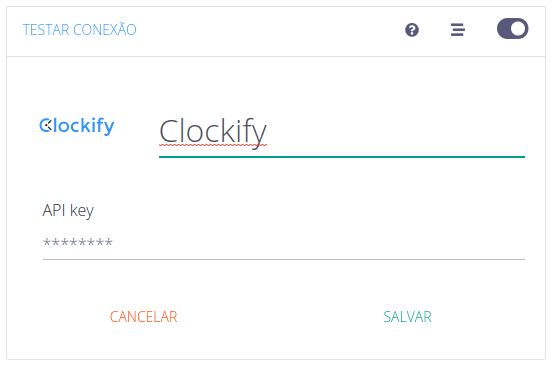
6) Now just name your data source and click SAVE
Pipelines
Summary
Relationship chart
Click to expand

Clients
Replication type: Full
Parameters:
- Workspaces: Filter which workspaces will be replicated or leave it empty to replicate all
Relationships:
Projects
Replication type: Full
Parameters:
- Workspaces: Filter which workspaces will be replicated or leave it empty to replicate all
Relationships:
Clockify project: a body of work that time entries are logged against, usually linked to a client and carrying its own rates and estimates.
| Campo | Tipo | |
|---|---|---|
|
text |
[en] Unique identifier of the project. |
|
|
boolean |
[en] Whether the project is archived. |
|
|
text |
[en] Name of the project. |
|
|
text |
[en] Color associated with the project, in hex. |
|
|
boolean |
[en] Whether time logged on the project is billable by default. |
|
|
text |
[en] Identifier of the client linked to the project. |
|
|
boolean |
[en] Whether the project time estimate is active. |
|
|
text |
[en] Project time estimate in ISO 8601 duration format (e.g. PT0S). |
|
|
text |
[en] Type of the time estimate (e.g. AUTO or MANUAL). |
|
|
text |
[en] Reset option for the time estimate (e.g. per period); null when no reset applies. |
|
|
text |
[en] Notes for the project. |
|
|
boolean |
[en] Whether the project is public in the workspace. |
|
|
text |
[en] Identifier of the workspace the project belongs to. |
|
|
boolean |
[en] Whether the project is a template. |
|
|
text |
[en] Currency of the project hourly rate. |
|
|
float |
[en] Amount of the project hourly rate. |
|
|
text |
[en] Total time already logged on the project, in ISO 8601 duration format. |
|
|
text |
[en] Overall project estimate in ISO 8601 duration format. |
|
|
text |
[en] Type of the overall project estimate (e.g. AUTO or MANUAL). |
|
|
text |
[en] Name of the client linked to the project. |
|
|
text |
[en] Currency of the project cost rate. |
|
|
float |
[en] Amount of the project cost rate (cost per hour). |
Tags
Replication type: Full
Parameters:
- Workspaces: Filter which workspaces will be replicated or leave it empty to replicate all
Relationships:
Tasks
Replication type: Full
Parameters:
- Workspaces: Filter which workspaces will be replicated or leave it empty to replicate all
Relationships:
Main object
Clockify task: a subdivision of a project that time can be assigned to.
| Campo | Tipo | |
|---|---|---|
|
text |
[en] Unique identifier of the task. |
|
|
text |
[en] Status of the task (e.g. ACTIVE, DONE). |
|
|
text |
[en] Name of the task. |
|
|
text |
[en] Identifier of the user set as primary assignee of the task. |
|
|
text |
[en] Identifier of the project the task belongs to. |
|
|
text |
[en] Task time estimate in ISO 8601 duration format. |
|
|
text |
[en] Total time logged on the task, in ISO 8601 duration format. |
clockify_tasks__assignees
Task assignees: the users assigned to a Clockify task (task-to-user relation).
| Campo | Tipo | |
|---|---|---|
|
text |
[en] Identifier of the task the assignee is assigned to. |
|
|
text |
[en] Identifier of the user assigned to the task. |
Time entries
This pipeline does not capture deletions. If a record is deleted in the tool, it will remain in your destination until the table undergoes an advanced edit. That is why we provide a Full version, which always reads all the data.
Replication type: Incremental with update window
Parameters:
- Update window (days): How many days previous to the savepoint the same period will still be refreshed
- Workspaces: Filter which workspaces will be replicated or leave it empty to replicate all
- Read start date (Savepoint): Data replication initial date
Relationships:
Main object
Clockify time entry: a logged block of worked time, with start, end and duration, linked to a user, a project and optionally a task.
| Campo | Tipo | |
|---|---|---|
|
text |
[en] Unique identifier of the time entry. |
|
|
text |
[en] Duration of the time entry in ISO 8601 duration format (e.g. PT25M). |
|
|
timestamp |
[en] Start date and time of the time entry. |
|
|
timestamp |
[en] End date and time of the time entry. |
|
|
boolean |
[en] Whether the time entry is locked for editing. |
|
|
text |
[en] Identifier of the workspace the entry belongs to. |
|
|
text |
[en] Description of the work logged in the time entry. |
|
|
text |
[en] Identifier of the task associated with the time entry, if any. |
|
|
boolean |
[en] Whether the time entry is billable. |
|
|
text |
[en] Identifier of the project associated with the time entry. |
|
|
text |
[en] Identifier of the user who logged the time. |
clockify_timeentries__tags
Time-entry tags: the relation between a time entry and the tags applied to it.
| Campo | Tipo | |
|---|---|---|
|
text |
[en] Identifier of the time entry the tag is associated with. |
|
|
text |
[en] Identifier of the tag applied to the time entry. |
Time entries [Integral]
Replication type: Full
Parameters:
- Workspaces: Filter which workspaces will be replicated or leave it empty to replicate all
Relationships:
Main object
Clockify time entry: a logged block of worked time, with start, end and duration, linked to a user, a project and optionally a task.
| Campo | Tipo | |
|---|---|---|
|
text |
[en] Unique identifier of the time entry. |
|
|
text |
[en] Duration of the time entry in ISO 8601 duration format (e.g. PT25M). |
|
|
timestamp |
[en] Start date and time of the time entry. |
|
|
timestamp |
[en] End date and time of the time entry. |
|
|
boolean |
[en] Whether the time entry is locked for editing. |
|
|
text |
[en] Identifier of the workspace the entry belongs to. |
|
|
text |
[en] Description of the work logged in the time entry. |
|
|
text |
[en] Identifier of the task associated with the time entry, if any. |
|
|
boolean |
[en] Whether the time entry is billable. |
|
|
text |
[en] Identifier of the project associated with the time entry. |
|
|
text |
[en] Identifier of the user who logged the time. |
clockify_timeentries__tags
Time-entry tags: the relation between a time entry and the tags applied to it.
| Campo | Tipo | |
|---|---|---|
|
text |
[en] Identifier of the time entry the tag is associated with. |
|
|
text |
[en] Identifier of the tag applied to the time entry. |
User groups
Replication type: Full
Parameters:
- Workspaces: Filter which workspaces will be replicated or leave it empty to replicate all
Relationships:
Users
Replication type: Full
Parameters:
- Workspaces: Filter which workspaces will be replicated or leave it empty to replicate all
Main object
Clockify user: a person who is a member of the workspace, with their personal preferences and settings.
| Campo | Tipo | |
|---|---|---|
|
text |
[en] Unique identifier of the user. |
|
|
text |
[en] Status of the user in the workspace (e.g. ACTIVE, INACTIVE). |
|
|
text |
[en] URL of the user profile picture. |
|
|
text |
[en] Name of the user. |
|
|
text |
[en] Identifier of the workspace currently active for the user. |
|
|
boolean |
[en] Whether the user logs time manually instead of using the timer. |
|
|
boolean |
[en] Whether grouping of similar time entries is disabled for the user. |
|
|
text |
[en] Default dashboard view type for the user (e.g. PROJECT, TEAM). |
|
|
text |
[en] User preferred date format (e.g. MM/DD/YYYY). |
|
|
text |
[en] Day the week starts for the user (e.g. MONDAY). |
|
|
boolean |
[en] Whether compact view is enabled for the user. |
|
|
boolean |
[en] Whether the user is alerted about long-running time entries. |
|
|
text |
[en] Primary grouping criterion for the user summary reports. |
|
|
text |
[en] Secondary grouping criterion for the user summary reports. |
|
|
boolean |
[en] Whether the dashboard is pinned to the top for the user. |
|
|
boolean |
[en] Whether the user receives weekly email updates. |
|
|
boolean |
[en] Whether the user is subscribed to the newsletter. |
|
|
text |
[en] Start-of-day time configured by the user (e.g. 09:00). |
|
|
text |
[en] User preferred time format (e.g. HOUR12, HOUR24). |
|
|
text |
[en] User time zone (e.g. America/Sao_Paulo). |
|
|
text |
[en] Data scope shown on the dashboard (e.g. ME for the user, TEAM for the team). |
|
|
float |
[en] Number of projects beyond which the project list is collapsed. |
|
|
boolean |
[en] Whether all project lists are collapsed by default. |
|
|
text |
[en] Identifier of the user default workspace. |
|
|
text |
[en] Email of the user. |
clockify_users_memberships
User memberships: the user associations to workspaces, projects or groups, with their status, type and rates.
| Campo | Tipo | |
|---|---|---|
|
text |
[en] Identifier of the user the membership belongs to. |
|
|
text |
[en] Cost rate associated with the user membership. |
|
|
text |
[en] Identifier of the membership target (workspace, project or group). |
|
|
text |
[en] Status of the membership (e.g. ACTIVE, PENDING). |
|
|
text |
[en] Type of the membership, indicating the target (e.g. WORKSPACE, PROJECT). |
|
|
float |
[en] Amount of the hourly rate associated with the membership. |
|
|
text |
[en] Currency of the hourly rate associated with the membership. |
Workspaces
Replication type: Full
Clockify workspace: the top-level container that groups projects, clients, users, tags and time entries, with its own time-tracking settings and permissions.
| Campo | Tipo | |
|---|---|---|
|
text |
[en] Unique identifier of the workspace. |
|
|
boolean |
[en] Whether the timesheet view is enabled in the workspace. |
|
|
text |
[en] Day of the week on which the automatic time-entry lock period starts (e.g. MONDAY). |
|
|
float |
[en] Number of periods used by the rule that automatically locks entries older than this value. |
|
|
text |
[en] Day of the week on which the automatic lock takes effect for weekly locking. |
|
|
text |
[en] Time unit of the age-based lock rule (e.g. DAYS, WEEKS). |
|
|
text |
[en] Type of automatic time-entry lock (e.g. WEEKLY, MONTHLY, OLDER_THAN). |
|
|
float |
[en] Day of the month on which the automatic lock occurs for monthly locking. |
|
|
boolean |
[en] Whether new projects are public by default. |
|
|
boolean |
[en] Whether the project favorites feature is enabled. |
|
|
boolean |
[en] Whether only admins can create tags in the workspace. |
|
|
boolean |
[en] Whether adding at least one tag is required when logging time. |
|
|
boolean |
[en] Whether only admins can create projects. |
|
|
boolean |
[en] Whether time tracking is recorded down to the second. |
|
|
boolean |
[en] Whether time rounding is applied in reports. |
|
|
text |
[en] Currency of the workspace default hourly rate (e.g. BRL, USD). |
|
|
float |
[en] Amount of the workspace default hourly rate. |
|
|
text |
[en] Workspace time-tracking mode (e.g. DEFAULT, STOPWATCH_ONLY). |
|
|
boolean |
[en] Whether only admins can see billable rates. |
|
|
boolean |
[en] Whether only admins can see time entries on public projects. |
|
|
boolean |
[en] Whether only admins can create tasks. |
|
|
boolean |
[en] Whether the project picker uses a special filter (e.g. filter by client). |
|
|
boolean |
[en] Whether selecting a project is required when logging time. |
|
|
boolean |
[en] Whether users can see the time tracker. |
|
|
text |
[en] Label used to group projects in the workspace (e.g. client). |
|
|
boolean |
[en] Whether selecting a task is required when logging time. |
|
|
boolean |
[en] Whether entering a description is required when logging time. |
|
|
boolean |
[en] Whether new projects are billable by default. |
|
|
text |
[en] Name of the workspace. |
|
|
text |
[en] URL of the workspace image or logo. |
|
|
timestamp |
[en] Date up to which time entries are locked for editing. |
|
|
boolean |
[en] Whether only admins can see all users time entries. |
|
|
boolean |
[en] Whether only admins can see the dashboard. |
|
|
float |
[en] Interval in minutes used to round time-entry duration. |
|
|
text |
[en] Rounding direction for duration (e.g. round up, down or to nearest). |
|
|
text |
[en] Subscription or plan tier that determines the features available in the workspace (e.g. FREE, PREMIUM). |
Notes
- Part of this documentation was automatically generated by AI and may contain errors. We recommend verifying critical information
Add Clockify as a data source on Kondado
Connect your Clockify time-tracking data to Kondado for ETL/ELT into your data warehouse or lake.
Verify Clockify permissions
Log in to Clockify with a user that has WORKSPACE_OWN or WORKSPACE_ADMIN permissions for the workspaces you want to replicate.
Generate your Clockify API key
Click your profile picture in the left sidebar, go to "Profile settings", then find or generate your API key in the API section and copy it.
Add Clockify on Kondado
Log in to Kondado, navigate to the data integration section, and select the Clockify data source.
Configure and save the connection
Paste your API key into the "API key" field, name your data source, and click SAVE to complete the setup.
Choose your destination and start syncing
Send your Clockify data to a destination like a data warehouse or BI tool. Note: this pipeline does not capture deletions unless you use the integral version.