Creating the data source
MailChimp was born as an alternative to the expensive and complex email marketing tools on the market, and today it is among the most used tools in the world for this purpose.
With MailChimp you can build email layouts, segment lists and automate campaigns — and not only that: in recent years the platform has evolved to call itself an "All-in-one Marketing Platform", letting users promote their business through social media, landing pages, Facebook ads and Google Ads, on top of integrating with more than 300 business apps.
Adding the data source
To replicate MailChimp with the Kondado platform and have access to all this data in your database in a matter of minutes, start by adding the data source following the steps below:
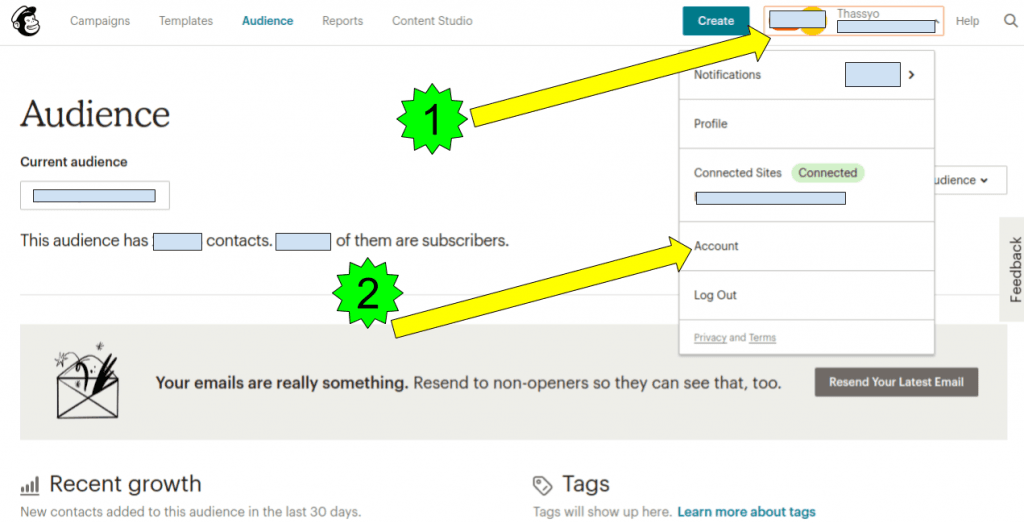
1) Log in to your MailChimp account and, on the home page, follow the steps as shown below
- Click on the top right, where your name is
- In the menu that opens, click on "Account"
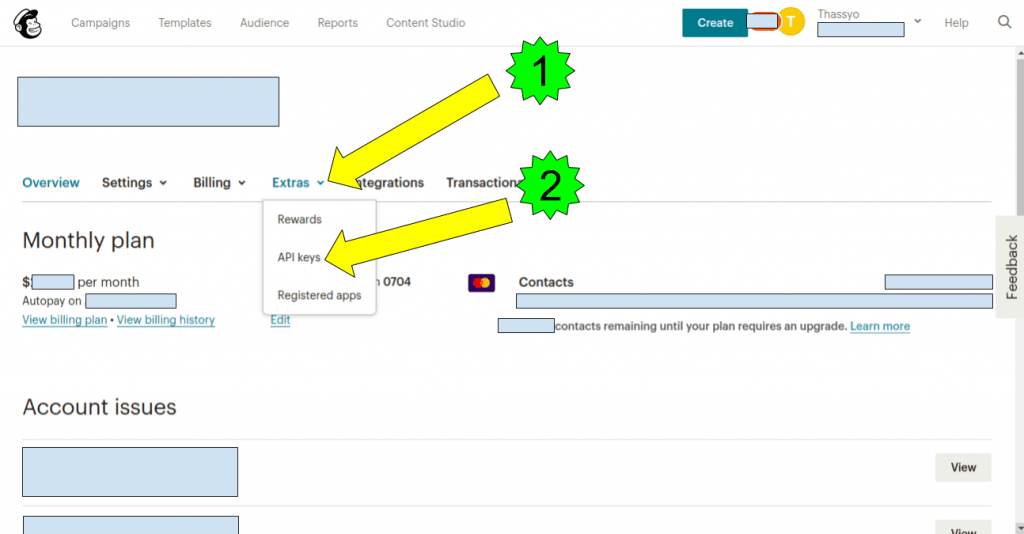
2) When you are on your account page, follow the steps as shown below
- In the middle section, click on "Extras"
- In the menu that opens, click on "API keys"
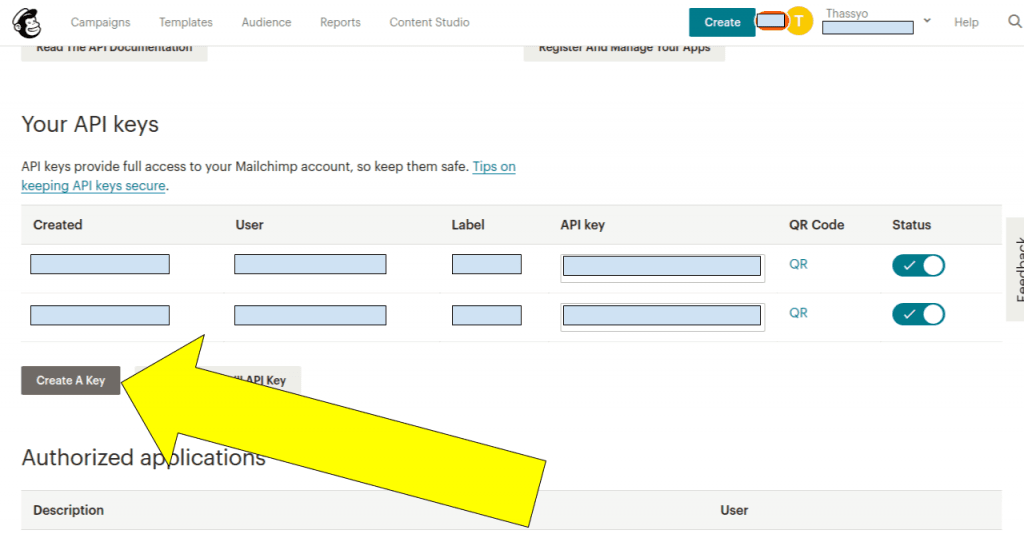
3) On the new page, you will see a list of your existing API Keys. Click on "Create a Key" as shown below
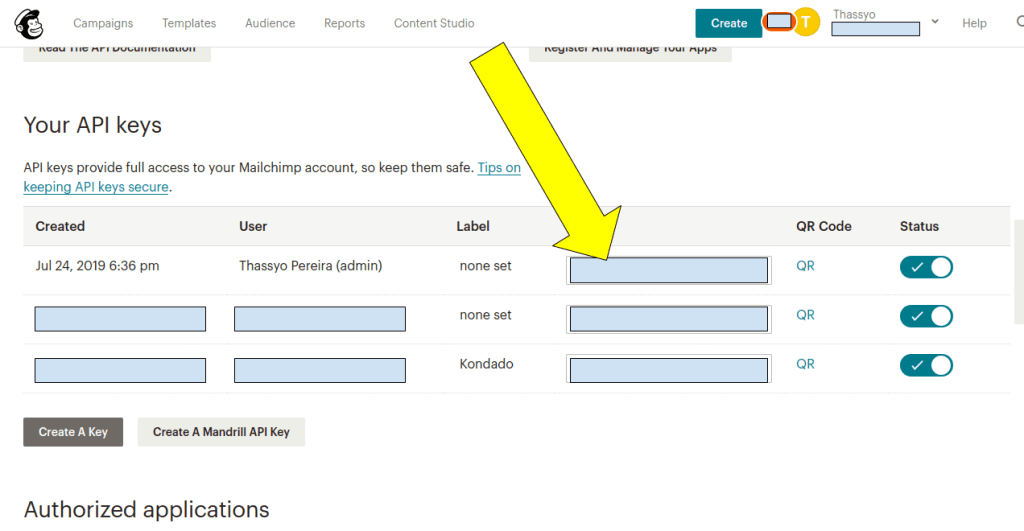
4) Once created, the new API Key will appear at the top of the list. Copy the value of the new API Key as shown below
5) Log in to the Kondado platform
6) On the Kondado platform, go to the add new data sources section and select the MailChimp data source
7) On the data source page, fill in the information as below
- Name: The internal description of the data source, for example: "Email Trigger"
- Username: Your mailchimp username (not your email!)
- API key: The api key obtained in step (4)
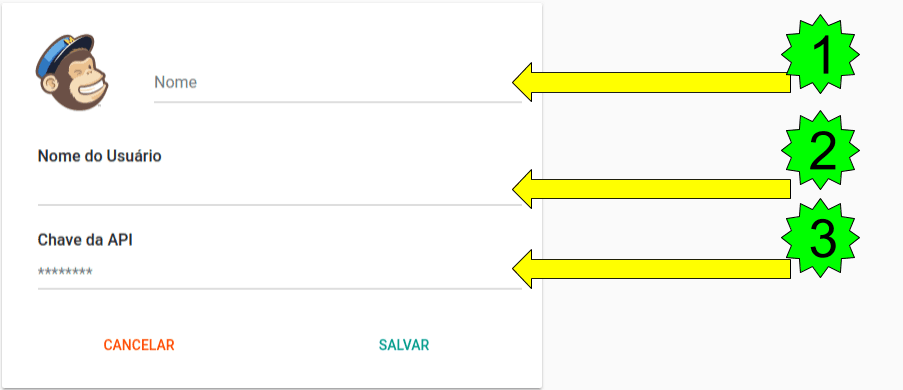
Now just click SAVE to start receiving data from MailChimp in your Data Warehouse, Data Lake or spreadsheet
Pipelines
Summary
Relationship chart
Click to expand

E-mail activity
Replication type: Incremental
Main object
Per-email/subscriber activity of a campaign. Grain: one sent email.
| Campo | Tipo | |
|---|---|---|
|
text |
[en] Unique identifier of the email sent to a subscriber. |
|
|
text |
[en] Email campaign identifier. |
|
|
boolean |
[en] Whether the audience is active. |
|
|
text |
[en] Identifier of the campaign audience (list). |
|
|
text |
[en] Subscriber email address. |
mailchimp_email_activity__activity
Individual activity events (open/click/bounce) per email. Child of email_activity.
| Campo | Tipo | |
|---|---|---|
|
text |
[en] Subscriber action type (open, click, bounce). |
|
|
text |
[en] IP address of the subscriber action. |
|
|
timestamp |
[en] Date and time of the subscriber action. |
|
|
text |
[en] Identifier of the campaign audience (list). |
|
|
text |
[en] Email campaign identifier. |
|
|
text |
[en] Unique identifier of the email sent to a subscriber. |
Reports
Replication type: Incremental
Main object
Mailchimp campaign reports: each row aggregates a campaign's metrics (sends, opens, clicks, bounces, e-commerce). Grain: one campaign.
| Campo | Tipo | |
|---|---|---|
|
float |
[en] Number of email forwards. |
|
|
float |
[en] Opens resulting from forwards. |
|
|
float |
[en] Number of abuse/spam complaints received. |
|
|
float |
[en] Facebook likes attributed to the campaign. |
|
|
float |
[en] Unique Facebook likes. |
|
|
float |
[en] Likes from campaign recipients. |
|
|
boolean |
[en] Whether the audience is active. |
|
|
timestamp |
[en] Campaign send date and time. |
|
|
text |
[en] Audience (list) name. |
|
|
float |
[en] Taxa de abertura benchmark (industry stats). |
|
|
float |
[en] Taxa de cliques benchmark (industry stats). |
|
|
float |
[en] Taxa de descadastro benchmark (industry stats). |
|
|
float |
[en] Taxa de denuncia de abuso benchmark (industry stats). |
|
|
float |
[en] Taxa de bounce benchmark (industry stats). |
|
|
text |
[en] Tipo benchmark (industry stats). |
|
|
float |
[en] Taxa de nao-abertura benchmark (industry stats). |
|
|
float |
[en] Total amount spent by buyers attributed to the campaign. |
|
|
float |
[en] Total revenue attributed to the campaign. |
|
|
text |
[en] Currency of the e-commerce metrics. |
|
|
float |
[en] Total number of orders attributed to the campaign. |
|
|
text |
[en] Campaign report identifier. |
|
|
float |
[en] Total number of unsubscribes generated by the campaign. |
|
|
text |
[en] Identifier of the campaign audience (list). |
|
|
text |
[en] Campaign preview text shown in the inbox after the subject line. |
|
|
text |
[en] Campaign type (e.g., regular, plaintext, rss, variate, automation). |
|
|
float |
[en] Total number of clicks in the campaign. |
|
|
timestamp |
[en] Date and time of the last click. |
|
|
float |
[en] Unique subscribers who clicked. |
|
|
float |
[en] Number of unique clicks. |
|
|
float |
[en] Click rate (clicks / delivered). |
|
|
timestamp |
[en] Date and time of the last open recorded for the campaign. |
|
|
float |
[en] Number of unique subscribers who opened the campaign. |
|
|
float |
[en] Open rate (unique opens / delivered emails). |
|
|
float |
[en] Total number of opens for the campaign (including repeat opens). |
|
|
float |
[en] Number of emails sent in the campaign. |
|
|
boolean |
[en] Whether delivery tracking is enabled. |
|
|
float |
[en] Taxa de abertura benchmark (list stats). |
|
|
float |
[en] Taxa de cliques benchmark (list stats). |
|
|
float |
[en] Taxa de descadastro benchmark (list stats). |
|
|
float |
[en] Audience (list) average subscribe rate: new subscribers gained per month. |
|
|
text |
[en] Subject line of the campaign email. |
|
|
float |
[en] Emails with hard bounce (invalid/permanent addresses). |
|
|
float |
[en] Emails with soft bounce (temporary failure). |
|
|
float |
[en] Emails with address syntax errors. |
|
|
text |
[en] Email campaign title. |
mailchimp_reports__timeseries
Campaign engagement time series (opens/clicks per hour after send). Child of reports.
| Campo | Tipo | |
|---|---|---|
|
timestamp |
[en] Date and time of the time-series data point (hourly interval after send). |
|
|
float |
[en] Number of emails sent during the time-series interval. |
|
|
float |
[en] Number of recipient clicks during the time-series interval. |
|
|
float |
[en] Number of unique opens during the time-series interval. |
|
|
text |
[en] Email campaign identifier. |
|
|
text |
[en] Identifier of the campaign audience (list). |
Notes
- Part of this documentation was automatically generated by AI and may contain errors. We recommend verifying critical information
Add MailChimp as a data source on Kondado
Connect your MailChimp account to Kondado to replicate email marketing data into your database or data warehouse in minutes.
Generate a MailChimp API key
Log in to MailChimp, click your name at the top right, go to Account > Extras > API keys, then click "Create a Key". Copy the new API key value that appears at the top of the list.
Add the MailChimp source on Kondado
Log in to the Kondado platform, navigate to the add new data sources section, and select the MailChimp connector.
Configure the connection credentials
Fill in the required fields: Name (an internal label such as "Email Trigger"), Username (your MailChimp username, not your email), and API key (the key copied in step 1).
Start replicating your marketing data
Once connected, Kondado will replicate MailChimp tables such as Reports, Timeseries, and Email Activity so you can analyze campaigns in your destination of choice.