Creating the data source
Requirements
- To generate the API Key you need a Mailchimp Standard or Premium account
Instructions
- Log in to your Mandrill account (Mailchimp Transactional) at mandrillapp.com
- Navigate to settings, find the API Keys section and click "New API Key"
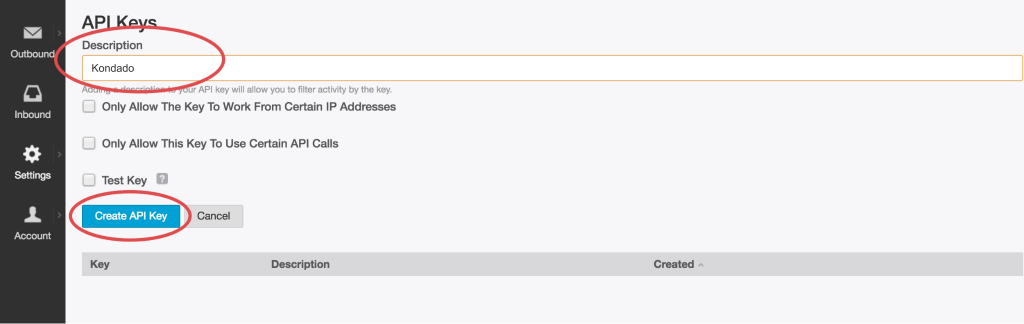
- Enter a description for your API Key, for example "Kondado", leave the other options unchecked and click "Create API Key"
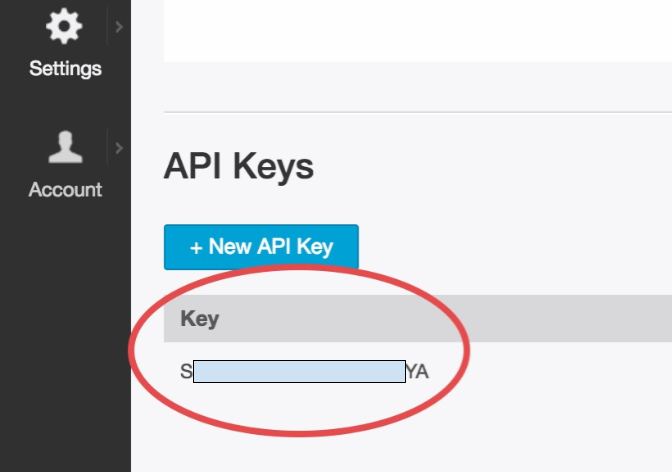
- Now copy the "Key" value that will appear
- Log in to Kondado, go to the add connectors section and select the Mandrill connector
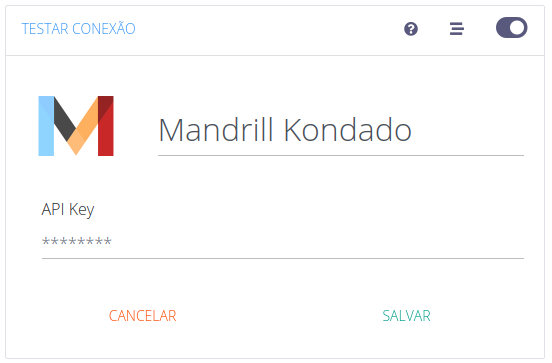
- In the connector, enter a name for your connector in "Name" and paste the value obtained in the previous step in "API Key"
- Click SAVE to start receiving Mandrill data in your Data Warehouse or Data Lake

Pipelines
Summary
Relationship chart
Click to expand

Email activity
Replication type: Incremental with update window
Parameters:
- Read start date (Savepoint): The initial email activity date (savepoint) for the data replication
- Update window after publication (days): How many days previous to the savepoint the e-mails will still be considered to have their data replicated
Relationships:
Mandrill email activity records with per-message status, metrics, and details.
| Campo | Tipo | |
|---|---|---|
|
text |
[en] Replication key for that row [generated by Kondado] |
|
|
text |
[en] Unique message identifier in Mandrill. Use to JOIN with message templates table. |
|
|
timestamp |
[en] Date of the event |
|
|
text |
[en] The email address of the recipient |
|
|
text |
[en] The email address of the sender |
|
|
text |
[en] The message's subject line |
|
|
text |
[en] Sending status of this message Possible values: "sent", "bounced", or "rejected". |
|
|
text |
[en] list of tags on this message |
|
|
text |
[en] Subaccount of this message |
|
|
int |
[en] How many times has this message been opened |
|
|
int |
[en] How many times has a link been clicked in this message |
|
|
text |
[en] Additional information about the bounce reason when available. |
Message Templates
Replication type: Incremental with update window
Parameters:
- Update window (days): Number of days to look back for updates
- Read start date (Savepoint): The initial date for reading message template data
Mandrill messages with template/slug info to enable JOINs with activity table.
| Campo | Tipo | |
|---|---|---|
|
text |
[en] Unique message identifier in Mandrill |
|
|
text |
[en] Template slug used to send the message (if applicable) |
|
|
text |
[en] The email address of the recipient |
|
|
text |
[en] The message subject line |
|
|
text |
[en] The email address of the sender |
|
|
text |
[en] Sending status of this message |
|
|
timestamp |
[en] Date and time of the event |
|
|
text |
[en] List of tags on this message, comma-separated |
|
|
int |
[en] How many times this message has been opened |
|
|
int |
[en] How many times a link has been clicked |
Notes
- Part of this documentation was automatically generated by AI and may contain errors. We recommend verifying critical information
Add Mandrill as a data source on Kondado
Connect your Mandrill transactional email data to Kondado by generating an API key and configuring the source.
Verify your Mandrill account type
Ensure you have a Standard or Premium Mandrill (Mailchimp Transactional) account, as these are required to generate an API key.
Generate a Mandrill API key
Log in to Mandrill, go to Settings > API Keys, click New API Key, name it (e.g., "Kondado"), leave other options unchecked, and click Create API Key.
Copy the API key value
After creation, copy the Key value that appears on screen — you'll need this to authenticate the connection.
Add Mandrill as a source in Kondado
Log in to Kondado, navigate to add data sources, and select the Mandrill connector. You can explore data integration options to understand how sources connect to destinations.
Configure and save the data source
Enter a Name for your source and paste the API Key from step 3, then click SAVE to start receiving data into your data warehouse or data lake.
Review available data and visualization options
Once connected, your Email Activity data will sync automatically. You can then explore pre-built Data Studio dashboards for Mandrill or other visualization tools to analyze email performance.
Frequently asked questions
event_date, email_address, sender, subject, status (sent/bounced/rejected), opens, clicks, tags, and subaccount.