Creating the data source
PostgreSQL is the most efficient general purpose database for creating Data Warehouses and Data Lakes due to its efficiency in complex joins and high availability during insertions of high volumes of information.
In this article, we will show how to register a PostgreSQL database as a destination on the Kondado platform.

2) Fill in your database information as shown below:
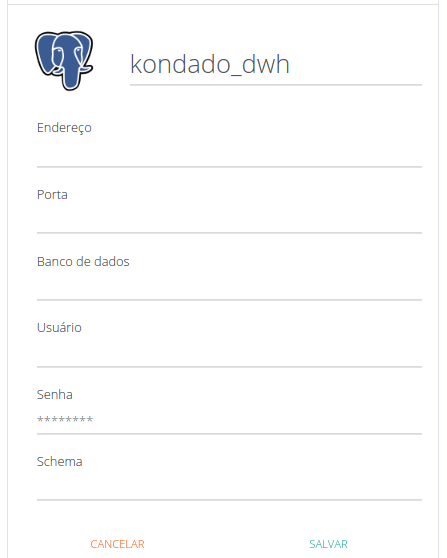
- Name: This is the internal description of your destination on the Kondado platform
- Address: Your database server address (IP or DNS)
- Port: Your database port (usually 5432)
- Database: the name of the database
- User: the username that Kondado will use to enter data into your database. This user must have permissions to DROP, INSERT, CREATE, ALTER, SELECT and DELETE tables and schemas
- Password: the user's password
- Schema: inform a schema or leave the default “public” [1]
Click save and your new destination will be created!
[1] Kondado will try to create the schema with the value informed in the “schema” parameter and if this is not possible (for example, due to lack of permission), the public schema will be used. Even if the schema already exists, Kondado must have permission to create schemas (“GRANT CREATE ON DATABASE db TO user”) if you do not want to use the public schema. For existing schemas, it is also important that the user registered at Kondado has permission to use the schema (“GRANT USAGE ON SCHEMA schema_name TO user;”)
Pipelines
Summary
Relationship chart
Click to expand

Notes
- Part of this documentation was automatically generated by AI and may contain errors. We recommend verifying critical information
Create a PostgreSQL data source on Kondado
Set up a PostgreSQL connection on Kondado to integrate your relational database into a cloud Data Warehouse or Data Lake for analytics.
Whitelist Kondado IPs
Configure your database server and VPC firewall to allow connections from Kondado's IP addresses on the PostgreSQL port. This secure network step is essential before any data integration can begin.
Gather connection credentials
Collect your PostgreSQL host address, port, database name, username, and password. You'll need these handy to authenticate when adding the source on the Kondado platform.
Add the PostgreSQL source on Kondado
Navigate to the data sources page on the Kondado platform, select PostgreSQL, give your source a descriptive name, and enter the credentials from the previous step.
Configure schema and save
Note that the schema parameter is for reference only—Kondado will discover all schemas, tables, views, and materialized views. Save the source to start integrating your data into your destination.
Set up incremental sync (optional)
For tables with a datetime/timestamp column tracking changes, enable incremental integration by defining the primary key (single or composite columns) to uniquely identify records.