Creating the data source
Our AWS Simple Storage Service (S3) destination allows you to create a data lake simply and inexpensively following the concept of separating storage from processing, common in databases.
By creating S3 as a destination at Kondado, you can ETL (or ELT) data from over 70 sources and use virtualization technologies such as presto, athena, dremio and Redshift Spectrum to perform queries on your data.
As in S3 there is a separation between processing and storage, our models do not apply to this destination. Additionally, data aggregation and deduplication (UPSERT) operations must be done by you, either in the virtualization layer or with scripts such as AWS Glue. To help you with this process, we added to this destination the possibility for you to send notifications to URLs that will trigger these processes.
Adding the connector
Creating the AWS access key
You can use the example policy below to grant the necessary permissions in your bucket.
Remember to edit the variable “CHANGE-THIS-WITH-BUCKET-NAME” with the actual name of your bucket.
{
  "Version": "2012-10-17",
  "Statement": [
    {
      "Effect": "Allow",
      "Action": [
        "s3:ListBucket",
        "s3:GetObject",
        "s3:PutObject",
        "s3:DeleteObject",
        "s3:CopyObject",
        "s3:AbortMultipartUpload",
        "s3:ListMultipartUploadParts",
        "s3:GetBucketLocation",
        "s3:ListBucketMultipartUploads",
        "s3:DeleteObjectTagging",
        "s3:ReplicateObject",
        "s3:GetObjectAcl",
        "s3:DeleteObjectVersion",
        "s3:PutObjectTagging",
        "s3:PutObjectAcl"
      ],
      "Resource": [
        "arn:aws:s3:::CHANGE-THIS-WITH-BUCKET-NAME",
        "arn:aws:s3:::CHANGE-THIS-WITH-BUCKET-NAME/*"
      ]
    }
  ]
}
If your bucket has KMS encryption enabled, you need to grant the IAM user access to the KMS key. You can use the policy below as an example (replace REGION:ACCOUNT-ID and CHANGE-THIS-WITH-KMS-KEY-ID)
{
  "Version": "2012-10-17",
  "Statement": [
    {
      "Effect": "Allow",
      "Action": [
        "kms:Encrypt",
        "kms:Decrypt",
        "kms:ReEncrypt*",
        "kms:GenerateDataKey*",
        "kms:DescribeKey"
      ],
      "Resource": "arn:aws:kms:REGION:ACCOUNT-ID:key/CHANGE-THIS-WITH-KMS-KEY-ID"
    }
  ]
}- In Key Id and Key Secret, fill in the previously generated key information
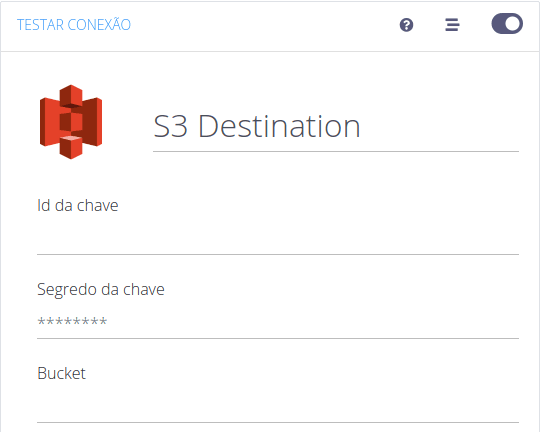
- In Bucket, just fill in the name of your existing bucket, without any URL formatting. For example, “my-bucket” is correct and “s3://my-bucket” is wrong. Also remember to use only the root name of the bucket, no child folders. For example, "my-bucket/my-folder" is wrong - if you want to put an additional folder, do so by filling in the table name in the integration
Pipelines
Summary
Relationship chart
Click to expand

Notes
S3 destination configuration and details
2. Output file format
We currently send files in the following formats:
2.1 JSON (jsonl)
This format saves data in JSON format, one on each line of the file, with quotes escaped by \. This is an example of a jsonl file that will be uploaded to your data lake:
{"\"keyword\"":"y","\"url\"":"https:\/\/mailchi.mp\/a37895aff5ac\/subscribe_newsletter","\"title\"":"https:\/\/mailchi.mp\/a37895aff5ac\/subscribe_newsletter","\"timestamp\"":[numero],"\"clicks\"":1}
{"\"keyword\"":"z","\"url\"":"https:\/\/pipedrivewebforms.com\/form\/43fd725e54683d565a44ed4872c3560f4639452","\"title\"":"Kondado - contato","\"timestamp\"":[numero],"\"clicks\"":2}
If you do not apply compression, the files will be saved with the extension “.json”
2.2 CSV
The CSV format will save files in this traditional format and with a “.csv” extension if you haven't provided any compression method. You will need to provide some additional file formatting parameters:
2.2.1 Column delimiter
Possible values for the column delimiter are
- Comma (",")
- Pipe("|")
- Tab("\t")
2.2.2 Quote
The quote parameter indicates how each column in a line of the file will be wrapped in quotes. Possible options are a 1 x 1 mapping with python's CSV module
- All
- minimal
- non-numeric
- None
We recommend the “All” format.
As you may have noticed, quote and the column delimiter can conflict with your content if these characters are also present in the values. So, all saved files have a default escape character for conflicting values, the backslash (“\”).
2.2.3 Header
You can also choose whether you want the uploaded files to come with a header or not. Remembering that, if you register a URL of notifications, sending a header becomes unnecessary, as we will send you the schema of the object, with the order of the columns according to how they were written in the file. Column order will also obey the same display order in our UI when you click on “DETAILS” of a given integration.
2.3 Parquet
Saves data in the parquet format. If compression is not used, the file extension will be .parquet
3. Compression
You can choose to apply a compression method to your files or not. The available compression methods will change the extension of saved files.
3.1 GZIP
Files compressed with the gzip method will receive the extension “.gz”
4. Notification URL
If the “Notify any URL” parameter is filled in, you will need to enter a valid URL in “URL for notifications”. This URL must be enabled to receive posts.
4.1 When will the URL notification occur?
At the end of an integration, for each object integrated and for each operation, we will make a post at the specified URL:
- “for each object” means that pipelines that populate more than one table will notify per table
- “for each operation” means that the send operations to the full tables and to the delta tables (if you chose to keep deltas) will make separate notifications
4.2 What if the URL fails?
We will consider as success a notification for the given URL that returns a 200 response code within 30 seconds. If the answer is different from this or takes longer, we will perform 3 more attempts and point out an error in the integration if the failure persists. However, files in full and deltas folders/prefixes will not be deleted
4.3 Payload Sent
With the data that will be sent to your notification URL, you will have all the necessary information to trigger further processes to handle the sent files. The default JSON payload fields are as follows:
4.3.1 pipeline_id
Id of the integration that generated the files. The id of an pipeline can be obtained through the URL of the Kondado pipeline in your browser: https://app.kondado.com.br/pipelines/pipeline_id
Example:
"pipeline_id":2319234.3.2 bucket
Bucket where the files were uploaded. Corresponds to the bucket registered by you in the destination parameters at the time the integration saved the files
Example:
"bucket":"my-kdd-data-lake"4.3.3 kdd_operation
Operation that triggered the notification. Possible values are:
- merge_deltas: indicates that this operation means sending data to the delta table
- merge_full: indicates that this operation means sending data to the full table
Example:
"kdd_operation":"merge_deltas"4.3.4 kdd_replication_type
The replication type of this integration (full/incremental). For incremental merges, you should “upsert” the file values with your main file. For full integrations, new uploaded files must replace the previous core file.
The possible values of this parameter are:
- drop: indicates that the integration is of the integral type
- savepoint: indicates that the integration is of the incremental type
This parameter is sent only when kdd_operation=merge_full.
Example:
"kdd_replication_type":"savepoint"4.3.5 kdd_replication_keys
If your integration is incremental (kdd_replication_type=savepoint), then this field will contain the fields (comma separated) that you should use to upsert with the main file.
Example:
"kdd_replication_keys":"lead_email,campaign_id"4.3.6 schema
Array of jsons with the fields sent to the files, in the order they appear (useful for CSV and also for your main aggregator file to have a consistent typing with your data).
In this array, each json will correspond to a field in the destination file and will contain the following information:
db_name: name of the field in the destination. This is the value you should use to create your main file.
type: field typing, according to Kondado standardization. The field types that are currently supported by this target are:
- text
- timestamp
- gives you
- float
- int
- boolean
- team
key: field name according to Kondado connector/CMS. For the purposes of aggregating the files into a main file, this field can be ignored, we are sending it for clarification purposes only
Example:
"schema":[
       {
          "db_name":"lead_id",
          "type":"text",
          "key":"id"
       },
       {
          "db_name":"etapa",
          "type":"text",
          "key":"Etapas__PerguntasRespostas->Etapa"
       },
       {
          "db_name":"pergunta",
          "type":"text",
          "key":"Etapas__PerguntasRespostas->Pergunta"
       }
]
4.3.7 files
Array with available file names and their location (prefix). For example:
"files":[
      "page_hits_deltas/[numero].gz",
      "page_hits_deltas/[numero].gz"
   ]
4.3.8 file_format
Final file format created. Remember that, if the file undergoes compression, the format will not correspond to its extension, but the file “inside” the compressed file will be in this format. Example:
"file_format":"json"4.3.9 file_format_params
If the selected file format requires additional formatting parameters (for example, CSV) this field will bring a JSON with the parameters used to create the file.
Example (CSV):
"file_format_params":{
    "csv_delimiter":"pipe",
    "csv_quote":"all",
    "csv_include_header":"yes"
}
4.3.10 file_compression
This parameter indicates the compression applied to the output file. If no compression has been applied, its value will be “no”.
Example:
"file_compression":"gzip"4.3.11 kdd_row_count
This parameter indicates how many records/lines there are in total in the uploaded files.
Example:
"kdd_row_count":291735. Prefix
The name/final part of the file will always be the timestamp in which the integration was performed + extension, in this format: [YYYYMMDDhhmmssfffff] [.] [extension]
In addition to this fixed name, with this prefix parameter, you can add variables that will help organize your bucket, they are:
- [exec_year]: Year (YYYY) the integration was executed
- [exec_month]: Month (MM) of execution of the integration
- [exec_day]: Day of the month (DD) the integration was executed
- [exec_hour]: Time (hh 24) the integration was executed
- [exec_minute]: Minute (mm) of execution of the integration
- [exec_second]: Seconds (ss) of integration execution
- [exec_millisec]: Milliseconds (fffffff) of execution of integration
These variables can be combined with free text and will be concatenated in front of the file name during insertion into S3.
Attention: It is necessary to write the brackets – ] and [
Example
Consider that the following prefix has been filled in:
[exec_year]/month=[exec_month]/{day=[exec_day]}/The final name of the file being this:
[numero].jsonIn this case, the name to be written in the destination table will be:
2021/month=09/{day=22}/[numero].jsonNote that a slash “/” was used at the end of the prefix ([exec_year]/month=[exec_month]/{day=[exec_day]}/) – if this slash was not inserted, the file would be 2021/month=09/ {day=22}[numero].json which may not be what you want
6. Date Format
For date and timestamp type columns, you can specify the date format:
- ISO: values will be written in ISO 8601 format
- Epoch: Values will be written in unix epoch time format, in seconds
General inquiries
Tables or folders or prefixes?
When we send data to other databases, we call the table records “sets”. In the case of S3, the way to gather records that belong to the same category is by prefixes (commonly called “folders”). To maintain consistency with the rest of the targets we support, we'll continue to call these sets of records tables. This way, whenever you see “table” within Kondado referring to the S3 destination, understand it as “prefix” (or “folder”). So, when giving the name to a “full table” you will be saying what should be the prefix (folder) of the files created in “full” mode
If you wish, you can use “/” in the table names to create a subfolder structure.
The tables/folders are the “fixed” part of the files insertion, that is, the files will always be sent to the same bucket/folder path. The creation of “sub-folders” with the prefix parameter allows greater dynamism, being possible to specify different folders for years, months, days, times, etc., which will be changed according to the moment of execution of the pipeline.
File creation flow of an integration
When looking at your S3 bucket, you will come across several “folders” that have a similar nomenclature to this “kdd_xxxxxxx_staging”. Files with this prefix are currently being merged by Kondado. Once the source data reading is finished, these staging folders will contain all the files from this run. Kondado will then copy these files to the full and deltas tables – at the end of this copy, we will trigger the notification to the registered URL.
Before and after each integration, the staging tables will be emptied to receive new files. So, we ask you not to delete these staging tables, as their integration may fail or, worse, generate incomplete data.
On the Kondado platform, when a destination is a database, our platform handles all data de-duplication with each update and arrival of new data. However, in the case of S3, this flow is the responsibility of the user using the replication_keys fields. If you don't use the notification URL, these replication fields can be found in the connector's documentation, when accessing the relationship graph. They will be marked with a circle next to the field. In rare cases, it is possible for two similar files to be uploaded in the same run, so your deduplication flow should be able to handle this when checking new files for deduplication.
- Part of this documentation was automatically generated by AI and may contain errors. We recommend verifying critical information
Add S3 as a data source on Kondado
Configure AWS IAM credentials and connect your S3 bucket to Kondado for CSV data integration.
Create an IAM policy for S3 access
In the AWS IAM Console, create a new policy named S3ReadListGenericBucketPolicy with s3:GetObject and s3:ListBucket permissions for your specific bucket ARN and its contents.
Create an IAM user with programmatic access
Add a new user (e.g., S3ReadUserGenericBucket) in the IAM Console and select Access key - Programmatic access as the credential type.
Attach the policy to the IAM user
On the Permissions page, attach the S3ReadListGenericBucketPolicy directly to your new user, then complete the user creation process.
Save the access keys securely
Download or copy the Access Key ID and Secret Access Key immediately—they are shown only once and are required for the Kondado connection.
Configure the S3 source in Kondado
In the Kondado platform, click CREATE + > Source > S3, enter your credentials, bucket name, and CSV parameters (delimiter, prefix, compression, header), then save.
Choose your replication strategy
Select Integral replication if files may be deleted between runs, or Incremental replication to track changes via _kdd_file_name and _kdd_insert_time columns.
Frequently asked questions
s3:GetObject and s3:ListBucket permissions on your specific bucket. These should be configured through a custom IAM policy attached to a dedicated IAM user with programmatic access..gz or .gzip extension, provided the archive contains only one CSV file inside./, or s3://. Do not use wildcards. Example: folder_x/folder_y/file_prefix__kdd_file_name and _kdd_insert_time columns. Learn more about data integration options on our platform.