Creating the data source
Zendesk Chat – formerly known as Zopim Chat – is a communication widget between companies and their customers that allows real-time interaction between both.
The tool is highly customizable and makes it possible to create the most diverse automations (including chat bots), monitor visits to your website in real time and can also help a lot in measuring user engagement with your product.
Among the most important KPIs that you can analyze with access to the Zendesk Chat API are:
- Response time;
- Average waiting time;
- Interaction satisfaction index;
- Total duration of the chat;
- Number of open vs. resolved chats;
- Number of chats handled per agent.
Adding the connector
To build the Zendesk Chat integration on the Kondado platform, just register the connector by following the steps below:
1) Access your Zendesk account as administrator/owner, click on the gear (settings) on the left side and, in channels, go to “chat”, then “Chat Panel”

2) Once on the chat page, on the left panel, go to “Settings” and then “Account”

3) On the new screen, go to “API and SDKs” at the top, then select “Add API Client”

4) Fill in the information as below, then click Create API Client
- Client name: Kondado
- Company: Kondado
- Redirect URLs: https://kondado.com.br

After creating the API client, a pop-up similar to the image below will appear. Copy the Client Id and Client Secret.

5) In the URL below replace the following:
https://COMPANY_NAME.zendesk.com/chat/oauth_login?auth={"scopes"%3A+["read"%2C+"write"]%2C+"state"%3A+null%2C+"redirect_uri"%3A+"https%3A%2F%2Fkondado.com.br"%2C+"response_type"%3A+"token"%2C+"client_id"%3A+"CLIENT_ID"}
- COMPANY_NAME: your zendesk domain (for example, in company.zendesk.com the company is your domain)
- CLIENT_ID: the client_id obtained above
Access the URL after replacing the values in your browser
6) After accessing the URL, you will be redirected to an authorization page as below. Select “Allow” and you will be redirected to the Kondado website

7) Once on the Kondado website, copy the URL into a text editor; its format will be something like the one below:
https://kondado.com.br/#access_token=YOUR_ACCESS_TOKEN&token_type=Bearer&scope=read+write
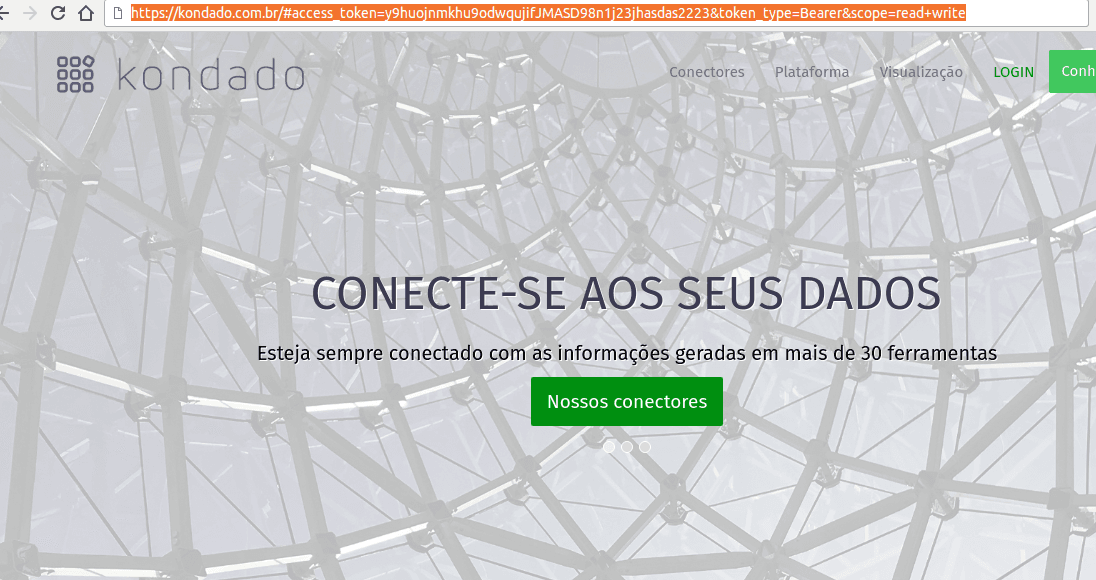
Select the part between “access_token=” and “&” (not including these values) — this is your access token.
8) On the Kondado platform, go to the add new connectors page and select “Zendesk Chat”
9) On the new connector page, give it a name, copy the token generated in step (7) and save

Pipelines
Summary
Relationship chart
Click to expand

Agents
Replication type: Full
Zendesk Chat agents: support staff registry with name, email and status. Grain: one agent.
| Campo | Tipo | |
|---|---|---|
|
text |
[en] Agent last name. |
|
|
timestamp |
[en] Agent account creation date and time. |
|
|
float |
[en] Number of times the agent has logged in. |
|
|
text |
[en] Unique agent identifier. |
|
|
text |
[en] Agent first name. |
|
|
text |
[en] Agent display name. |
|
|
boolean |
[en] Whether the agent is the account owner. |
|
|
boolean |
[en] Whether the agent is an administrator. |
|
|
text |
[en] Skills assigned to the agent. |
|
|
boolean |
[en] Whether the agent is active. |
|
|
text |
[en] Departments the agent belongs to. |
|
|
text |
[en] Identifier of the agent role. |
|
|
timestamp |
[en] Agent last login date and time. |
|
|
text |
[en] Agent email. |
Chats
Replication type: Incremental
Parameters:
- Read start date (Savepoint): The start date to replicate the data
Relationships:
Main object
Zendesk Chat sessions: each row is a visitor conversation, with agents, department, duration, message counts and rating. Grain: one chat.
| Campo | Tipo | |
|---|---|---|
|
text |
[en] Final comment/rating left about the chat. |
|
|
boolean |
[en] Whether the chat was a response to an automatic trigger. |
|
|
text |
[en] Visitor satisfaction rating for the chat (e.g. good/bad). |
|
|
text |
[en] Visitor phone number. |
|
|
text |
[en] Notes recorded about the visitor. |
|
|
text |
[en] Visitor email. |
|
|
text |
[en] Visitor name. |
|
|
text |
[en] Unique visitor identifier. |
|
|
timestamp |
[en] Visitor session end date and time. |
|
|
text |
[en] Visitor IP address during the session. |
|
|
text |
[en] Visitor country code. |
|
|
text |
[en] Visitor session identifier. |
|
|
text |
[en] Visitor city. |
|
|
text |
[en] Visitor region/state. |
|
|
text |
[en] Visitor platform/operating system. |
|
|
text |
[en] Visitor user agent (browser/device). |
|
|
text |
[en] Visitor country name. |
|
|
timestamp |
[en] Visitor session start date and time. |
|
|
text |
[en] Browser used by the visitor. |
|
|
float |
[en] Chat duration in seconds. |
|
|
text |
[en] Names of the agents who took part in the chat. |
|
|
text |
[en] Search engine that referred the visitor before the chat. |
|
|
text |
[en] Unique chat identifier. |
|
|
timestamp |
[en] Chat end date and time. |
|
|
text |
[en] Search terms used by the visitor before the chat. |
|
|
boolean |
[en] Whether the chat was missed (not answered by an agent). |
|
|
text |
[en] Who started the chat (visitor, agent or trigger). |
|
|
text |
[en] Identifiers of the agents who took part in the chat. |
|
|
text |
[en] Chat type (live chat or offline message). |
|
|
text |
[en] Identifier of the department of the chat. |
|
|
boolean |
[en] Whether the chat was started by an automatic trigger. |
|
|
text |
[en] Tags associated with the chat. |
|
|
timestamp |
[en] Chat date and time (start). |
|
|
float |
[en] Maximum agent response time in the chat, in seconds. |
|
|
float |
[en] Average agent response time in the chat, in seconds. |
|
|
float |
[en] First agent response time in the chat, in seconds. |
|
|
float |
[en] Number of messages sent by the visitor. |
|
|
float |
[en] Total number of messages in the chat. |
|
|
float |
[en] Number of messages sent by agents. |
|
|
text |
[en] Identifier of the associated Zendesk Support ticket. |
|
|
text |
[en] Conversions recorded associated with the chat. |
|
|
text |
[en] Name of the department of the chat. |
|
|
boolean |
[en] Whether the chat has unread messages. |
zendeskchat_chats__webpath
Visitor navigation path (pages visited) during the chat. Child of chats.
| Campo | Tipo | |
|---|---|---|
|
text |
[en] Unique chat session identifier. |
|
|
timestamp |
[en] Date and time the visitor viewed the page. |
|
|
text |
[en] Origin page in the visitor navigation. |
|
|
text |
[en] Destination page in the visitor navigation. |
|
|
text |
[en] Title of the page visited during the chat. |
zendeskchat_chats__history
Chat message history: each row is an exchanged message, with sender, channel and content. Child of chats.
| Campo | Tipo | |
|---|---|---|
|
text |
[en] Sender name of the history message. |
|
|
text |
[en] Date and time of the chat history message/event. |
|
|
text |
[en] Department name of the history message. |
|
|
text |
[en] Type of the history event/message (e.g. message, agent join/leave). |
|
|
text |
[en] Channel of the history message. |
|
|
text |
[en] Department of the history message. |
|
|
text |
[en] Unique chat session identifier. |
|
|
text |
[en] Identifier of the history message. |
|
|
text |
[en] Sender type of the message (visitor, agent or system). |
|
|
text |
[en] Text content of the history message. |
|
|
text |
[en] Options presented to the visitor in the history message. |
|
|
text |
[en] Identifier of the automatic trigger that generated the message. |
|
|
text |
[en] Agent who sent the message in the history. |
|
|
text |
[en] Reason associated with the history event (e.g. transfer or end reason). |
Notes
- Part of this documentation was automatically generated by AI and may contain errors. We recommend verifying critical information
Add Zendesk Chat as a Kondado data source
Configure OAuth authentication and connect your Zendesk Chat (formerly Zopim) data to the Kondado platform for pipeline creation.
Create an API client in Zendesk Chat
Access your Zendesk account as administrator, navigate to Settings > Account > API and SDKs, then click "Add API Client". Fill in Customer name and Company as "Kondado", set Redirect URLs to https://kondado.com.br, and save the generated Client Id and Client Secret.
Generate the OAuth authorization URL
Replace COMPANY_NAME and CLIENT_ID in the provided URL template with your Zendesk domain and the client_id from step 1. Access this URL in your browser to reach the Zendesk authorization page.
Authorize and capture the access token
On the authorization page, select "Allow" to be redirected to the Kondado website. Copy the full URL and extract the token value located between "access_token=" and "&" for use in the next step.
Add Zendesk Chat on the Kondado platform
Go to add data sources on Kondado's data integration section, select "Zendesk Chat", give your source a name, paste the token extracted in step 3, and save to complete the connection.
Explore available tables and fields
Once connected, review the relationship chart and main objects including Chats, webpath, history, and Agents tables to understand the data structure for your pipeline configuration.
Frequently asked questions
access_token= and &. Then on the Kondado platform, when adding the Zendesk Chat data source, paste this token, name your source and save.