
Most Data Analytics stacks comprise three stages: An ETL tool + a Data Warehouse to centralize data + a visualization or BI tool. Here we will show how to use Microsoft Power BI as a BI tool, together with PostgreSQL as the Data Warehouse and Kondado as your ETL tool.
3. Creating your first integration: Now that your data destination and data sources are registered, you can create your first integration by following the platform onboarding steps.
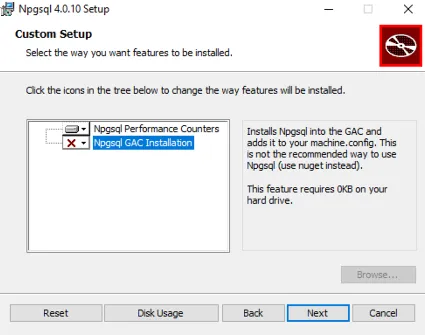
Open the downloaded file and follow the installer's step-by-step guide. On the “Custom Setup” screen, select the option “Npgsql GAC Installation” and complete the installation:
If your PostgreSQL database is hosted by AWS, click here to download AWS's public key.
Convert the downloaded key into a certificate by accessing https://www.sslshopper.com/ssl-converter.html and using the settings from the image below:

When you click on “Convert Certificate” in the previous step, a file will start downloading.
Open the Windows command center by searching for “mmc” in the start bar:

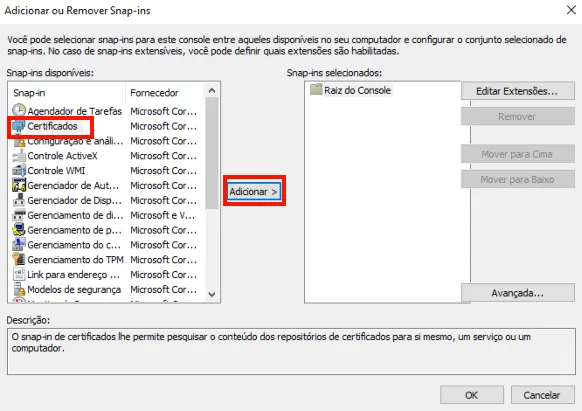
Click on “Add/Remove Snap-in”:

Select “Certificates” and then click on “Add”:
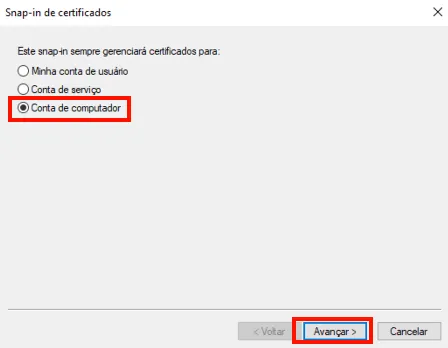
Select “Computer Account” and click on “Next”:
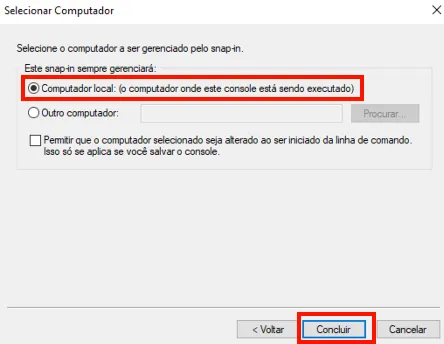
Select the “Local Computer” option and click on “Finish”:
Note that “Certificates” will appear in the right box. Click on “Ok”:

Click on “Certificates”, and right-click on “Trusted Root Certification Authorities”. Select “All Tasks” and click on “Import”:

In the window that opens, click on “Next” and then “Browse”.
Go to the folder where you saved the certificate, and change the file format to “PKCS #7 Certificates”. You should then select the certificate file and click on “Open”:

In the certificate import wizard, click on “Next” and then on “Finish”. You will receive an alert notifying that the import was successful.
6. Connecting Postgres to Power BI:
- On the Power BI home page, click on “Get Data” in the top bar:

- Select the “Database” option in the side menu:

- Then choose the “PostgreSQL database” option from the list and click on “Connect”:

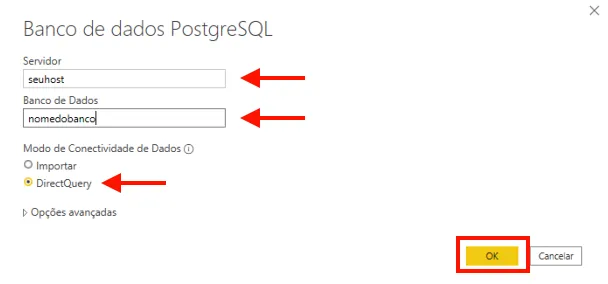
- Fill in the server data and database name and select the “DirectQuery” option so that your data is updated in real-time. Click on “OK”:
- Enter the database user name and password. Click on “Connect”:

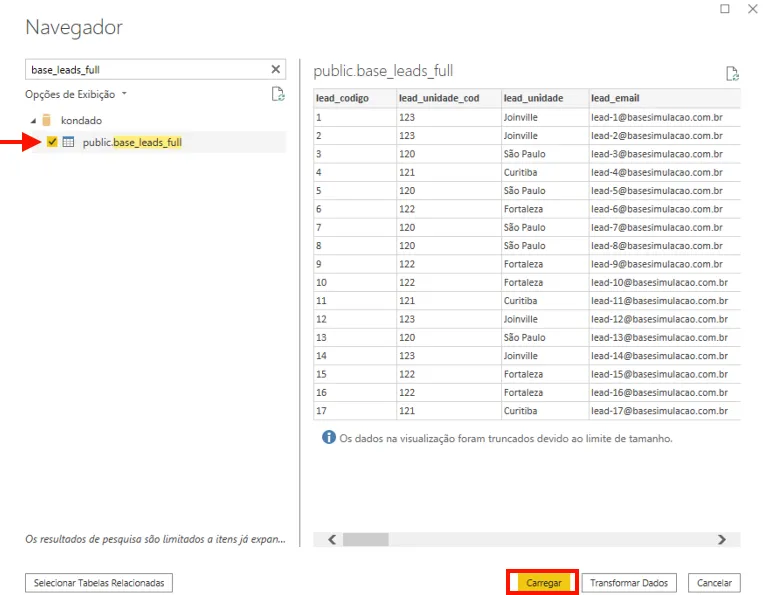
- Now you will need to choose from a list which tables from your PostgreSQL database you want to bring into Power BI (remember to search by the table names you defined when creating your integration in Kondado, as per step 4). Just check the box next to the table names and click on “Load” once all are selected:
- Done! Now your PostgreSQL is connected to Power BI and your data will be available for viewing or transforming whenever you need:

Connect Power BI to PostgreSQL using Kondado
Set up the full ETL + data warehouse + BI stack: register PostgreSQL in Kondado, create pipelines to load your data, and connect Power BI Desktop to the PostgreSQL warehouse.
Register PostgreSQL as a Kondado destination
Sign in to Kondado and add PostgreSQL as a destination, providing the host, port, database name, user, and password of your warehouse.
Add your data sources
Create the data sources you want to centralize (CRM, e-commerce, ads, etc.) following the instructions in the Kondado wiki.
Build the pipelines into PostgreSQL
From each source, create the pipeline that loads the relevant tables into your PostgreSQL destination and run it. Pipelines refresh at the frequency you choose.
Install the NpgSQL provider for Power BI
On the machine running Power BI Desktop, install Npgsql 4.0.10 and enable the "Npgsql GAC Installation" feature so Power BI can recognize the provider.
Connect Power BI to PostgreSQL
In Power BI Desktop, choose Get Data → PostgreSQL database, enter the server and database, and authenticate. For AWS RDS, first install AWS's public certificate so the SSL handshake succeeds.
Load Kondado tables and build your report
Pick the tables you created with Kondado, click Load, and build your visuals. Schedule the Kondado pipelines so the warehouse stays current and your Power BI report reflects fresh data.