
This article is part of our series to help you get started with analyzing cloud data. Today we are going to show you how to launch a BigQuery database from a Google Cloud account. See also how to create a PostgreSQL database on AWS.
BigQuery is a Big Data solution created by Google that enables large-scale data storage and analysis. To create your BigQuery database, check out the step-by-step below.
2) Click “Get started for free” to start your free trial:

3) Check the Google account you will use for Google Cloud (if you want to switch, just click on “Switch Account” and select the desired account) and read the terms of service, if you agree, just select all the boxes and click continue:

4) Choose the type of account between “Individual” (individual) and “Business” (legal entity). In the case of an “Individual” account, insert your CPF and your date of birth, in the case of a “Business” account, insert the company’s CNPJ and click on “Verify”:

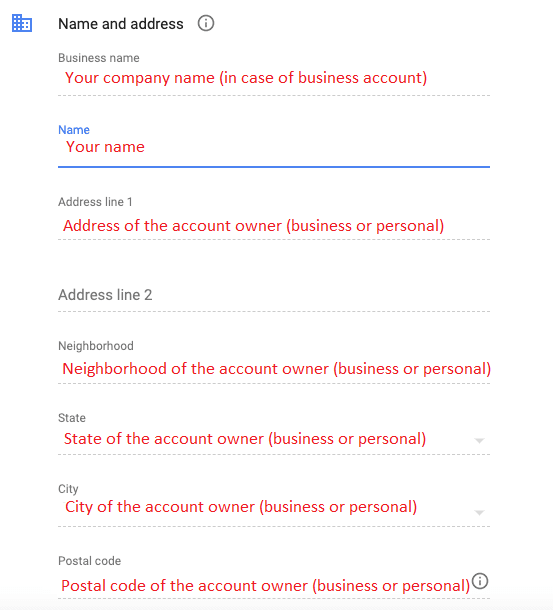
5) Fill in the name and address information as indicated in red below:
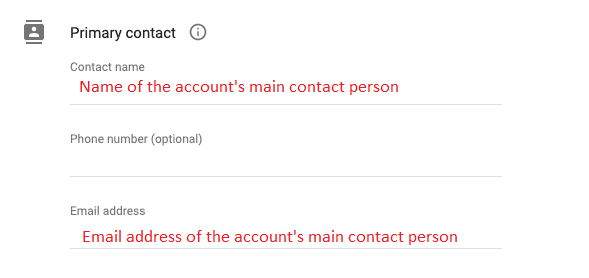
6) Enter the contact details of the main contact (person in the company responsible for payments):
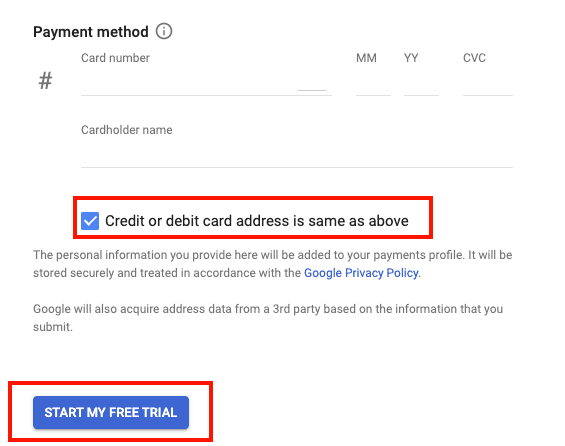
7) Enter the credit card information that will be used for Google Cloud payment.
Important: Google's trial period grants an initial credit of $300 dollars free to be consumed within 90 days, however, regardless of the credit, the account must be upgraded for the Kondado integrations to work (step 15 of this tutorial).
If the card billing address is the same as that entered in step 5, leave the box located below the card information checked. If the address is not the same, uncheck the box and enter the correct address.
Then click on “Start my free trial” to start the free trial:
8) You will then be taken to the Google Cloud console. In the top search bar type “Big Query” and click on the first option:

9) Done! You now have access to BigQuery.

10) Before adding BigQuery as a destination on the Kondado platform, create a project and a dataset to receive the integrations. To create a project, click on “My First Project” in the top bar, then on “New Project”:

11) Choose a name for the project. The organization and location fields will come with automatic Google suggestions. Click “Create” to create the project:

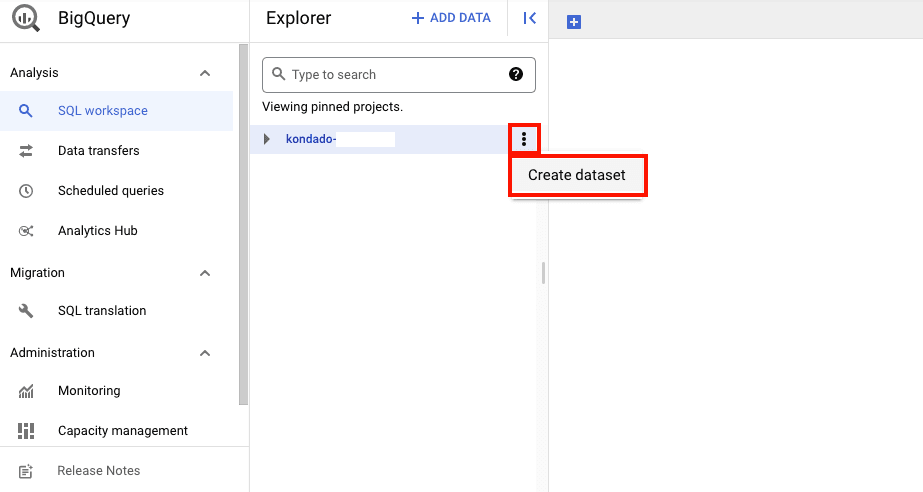
12) To create a dataset, find the newly created project in the explorer bar, click on the 3 dots icon next to the project and then on “Create dataset”:
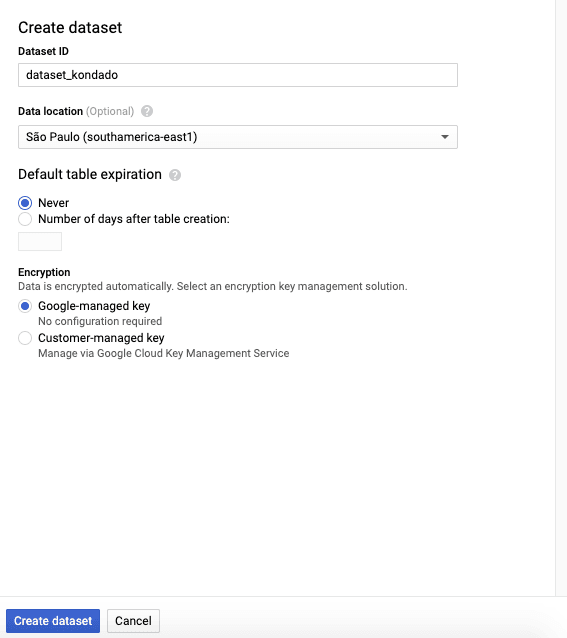
13) Choose an ID for the dataset, select the location where the dataset will be hosted (in our example, we will host the dataset in the “São Paulo” region), and define whether the dataset should have an expiration date (when the dataset will be deleted). In our case, we selected “Never” for the dataset to never expire. Then click on “Create Dataset” and your dataset will be created.
14) Now you’re ready to add BigQuery as a destination on the Kondado platform.
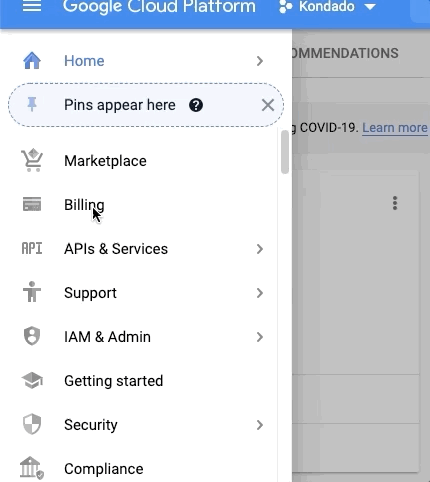
15) Before creating integrations for BigQuery in Kondado, it is necessary to upgrade the account. To upgrade, click on “Billing” in the menu located to the right of the console:
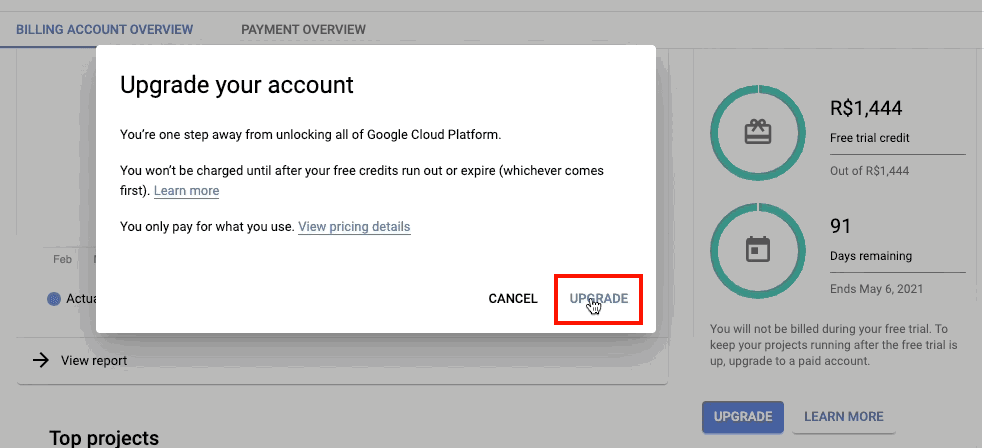
14) Click on “Upgrade”:

15) And then again on “Upgrade”:
Create a BigQuery Database on Google Cloud for Kondado
Sign up for Google Cloud, create a project and dataset in BigQuery, upgrade the account, and prepare it as a Kondado destination.
Create your Google Cloud account
Go to <a href="https://cloud.google.com/">cloud.google.com, click Get started for free, choose Individual or Business, fill in your details, and add a credit card. Google offers $300 in credits for 90 days for new accounts.
Create a Google Cloud project
In the Google Cloud console, open the project selector and click New Project. Give it a meaningful name and confirm the organization, if any.
Open BigQuery and create a dataset
In the console menu, open BigQuery. Select your project, click Create dataset, set a dataset ID, choose a location (for example, São Paulo), and set the default table expiration to Never.
Upgrade the Google Cloud account
Open the Billing menu and upgrade the account from the trial. Kondado integrations require an upgraded billing account even while you still have free credits.
Register BigQuery as a destination in Kondado
In Kondado, add your project and dataset as a destination, authorize the service account, and start creating pipelines into BigQuery.