
This article is part of our series to help you get started with analyzing cloud data.
RDS versus EC2
- No need to install anything! The database is already pre-configured.
- AWS has developed several functions specific to databases, such as creating read replicas with just a few clicks and automatic version updating.
- Specific metrics to monitor databases like used space, latency and performance
- Super-fast backups and restores
Postgresql (or PG or Postgres)
In this article, we will teach you how to create a Postgresql database. Postgres is an open-source relational database, with a very active development community (and supporting tutorials), which is continually reinventing itself and comes with several extensions that can be easily installed.
Until recently, Postgres supported operations that MySQL (another popular and commonly used database for Data Warehouses and Data Lakes) did not, such as full joins, window functions and common table expressions (CTEs) – all vital to analyze data efficiently.
Creating a Postgres database on AWS
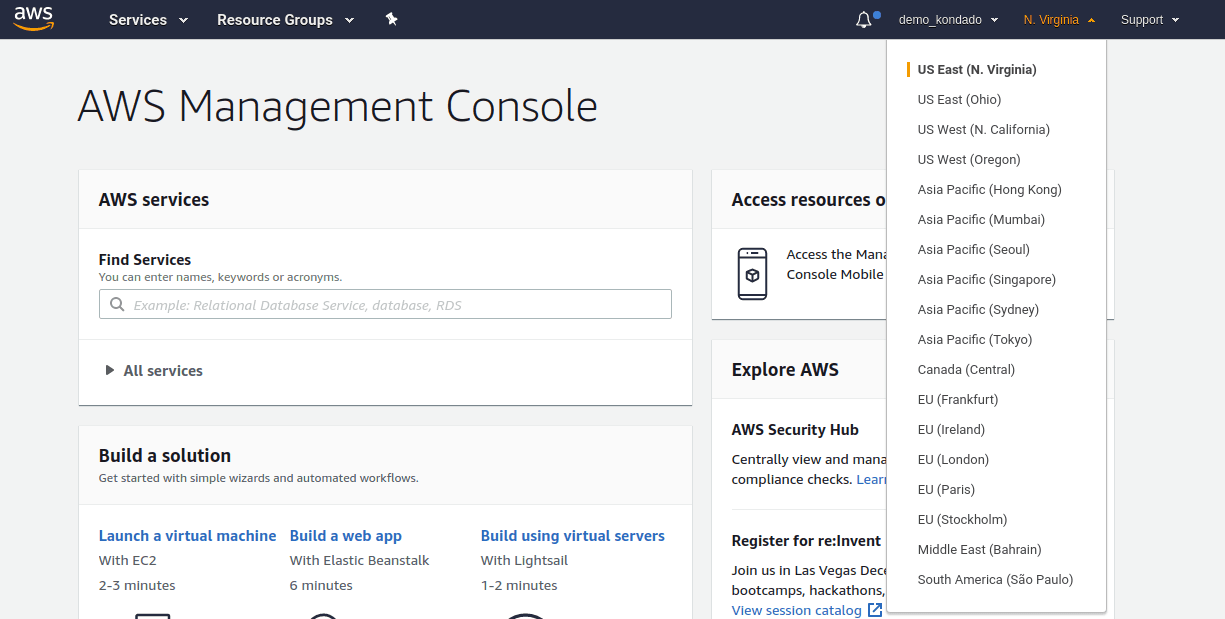
1) Choose your region. On the right side of the top menu, you have the option to choose the region where you will create the database. AWS Regions indicate which data center your database will be created in, and the hourly prices for that database will vary by region. Creating a database in São Paulo, for example, is much more expensive than creating in Virginia, despite offering better latency. As this article is dedicated to analytical databases (Data Warehouses and Data Lakes), we find a latency of a few microseconds acceptable and will be creating in the US East 1 region (N. Virginia):
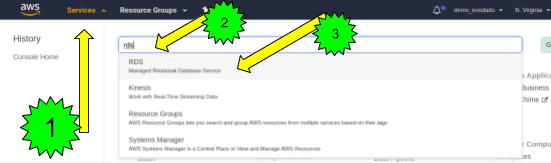
2) Select the RDS service by clicking (1) “Services” on the left of the top bar, then type (2) “RDS” in the search bar and (3) select the service:
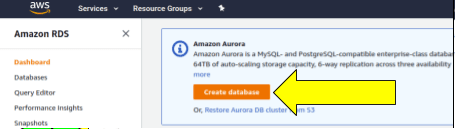
3) On the RDS main screen, select “Create database” as shown in the image below:
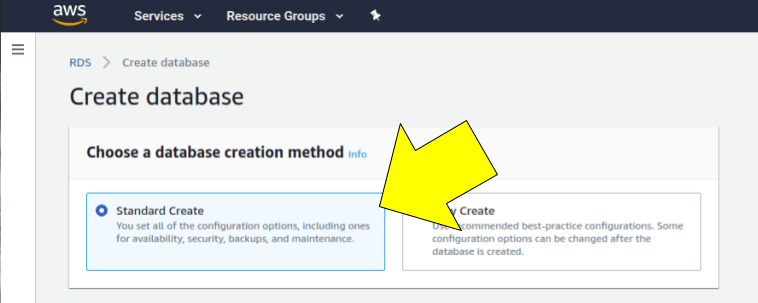
4) Now you will be on your database configuration screen. In the first option, you must select “Standard Create”, which will be the method that we will use in this article:
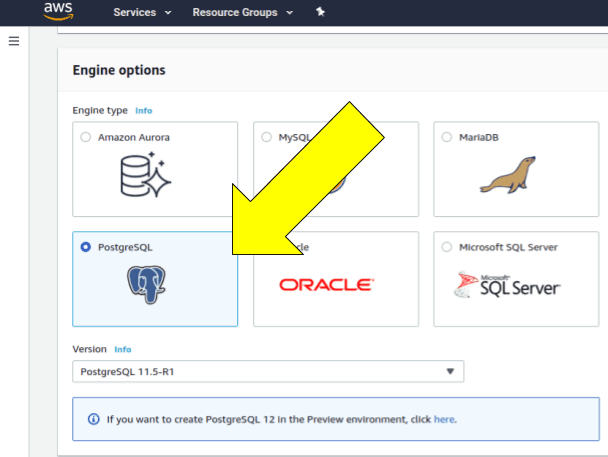
5) Just below, you should select which type of database you want to create. Select "PostgreSQL":
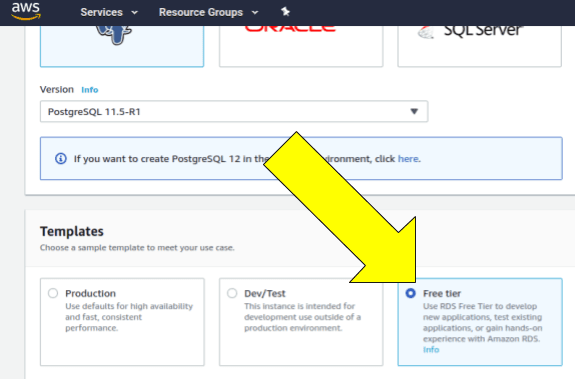
6) In the next section, you can choose a creation template. As we mentioned earlier, AWS offers a benefit for new members called free-tier, which helps us save a lot during the first few months. Let's select this option as shown in the image below:
7) In the section below, we will configure some database details, among them the server identifier, the master username and its password. Filling it in is quite simple, as shown below. Fill in this information and do not forget to write down the master user password, as this information cannot be retrieved later:

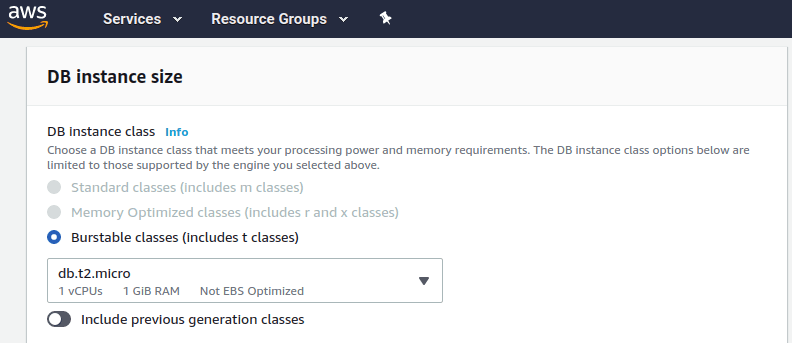
8) The next section has already been filled in according to the free-tier template we chose, we can keep it as shown in the image below:
9) The storage section must also be filled in as per the free-tier template and does not require modification:

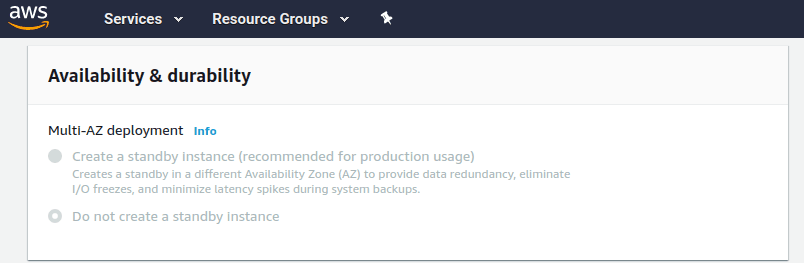
10) The same goes for the availability & durability section, which we can leave as per the template:
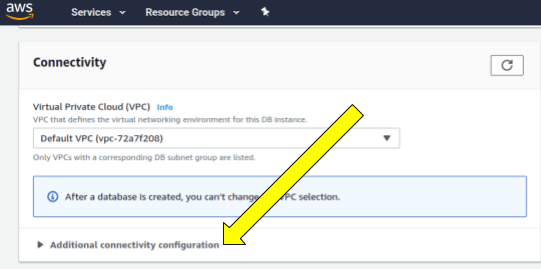
11) In the connectivity section, you can choose the VPC where you will create your database, or even create a new one. If your account is recent, just leave the VPC that is selected. Also in this section, it is important to change some details so that your database can be accessed from machines outside your network, such as your visualization and analysis tools (don't worry, we will block the firewall in your VPC later on). Click on Additional connectivity configuration as shown below:
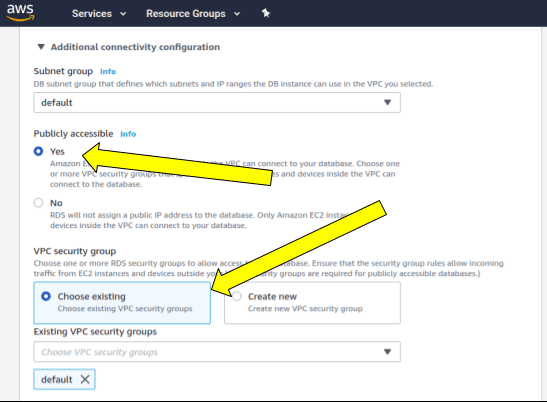
12) In the additional settings, you'll be asked if you'd like your database to be publicly accessible (again, don't worry about naming, we'll put in other rules to prevent public access later on). Select yes, as shown in the image below. For simplicity, we will also keep the same security group as the VPC where we are creating it:
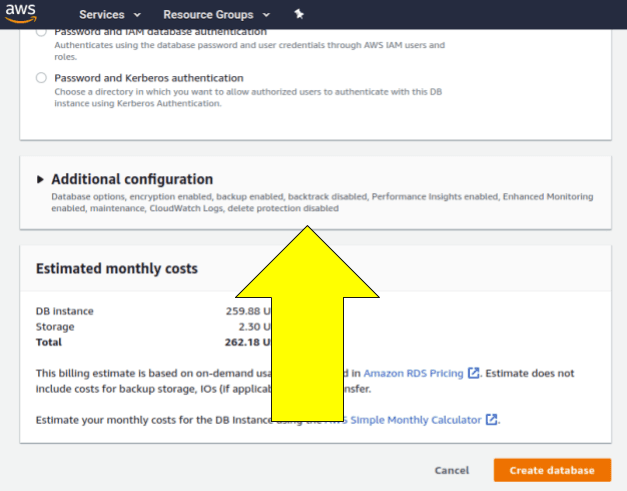
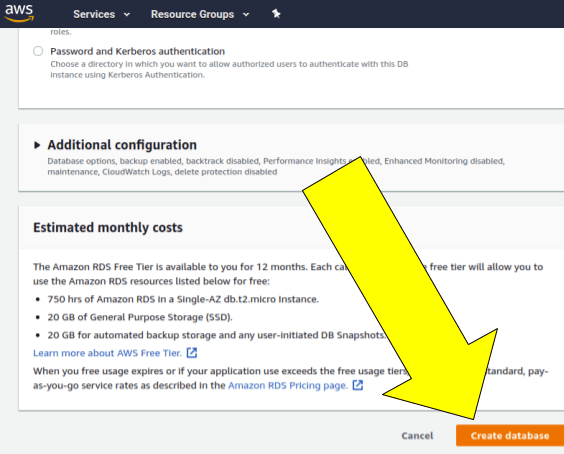
13) After this configuration, find the “Additional configuration” section that will be right at the bottom of the page as shown in the image below:
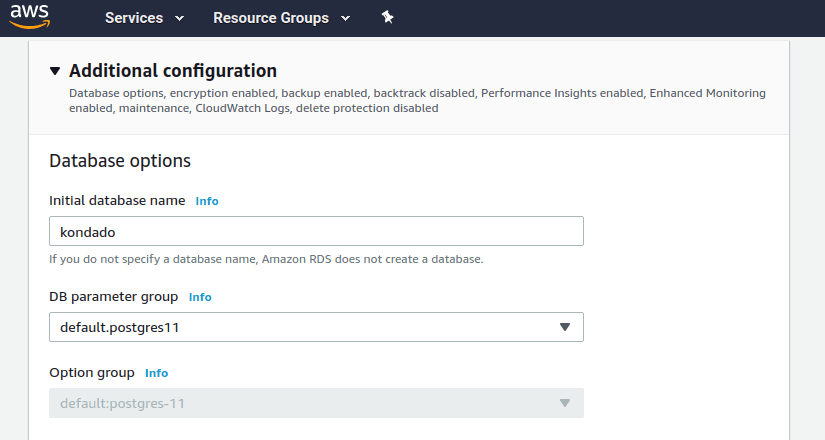
14) Give your database an initial name, for example “kondado”:
15) After that, just scroll to the bottom of the page and click on “Create database”:
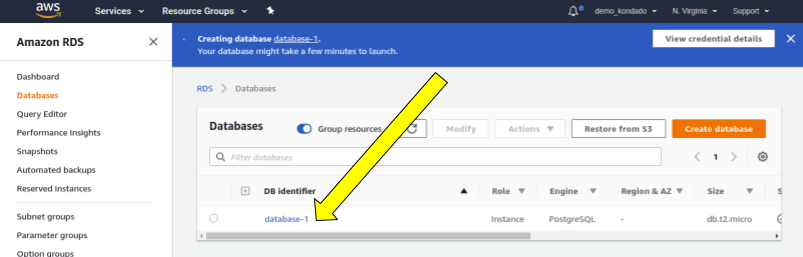
16) After a few moments, you will be redirected to the page that lists your databases and you can see that your new database is being created. While this process is running, let's configure the security rules of your database by clicking on it as shown in the image below:
17) On your database's page, (1) find the Connectivity & security section as shown in the image below and (2) click on the name of your security group, as shown in the image below:

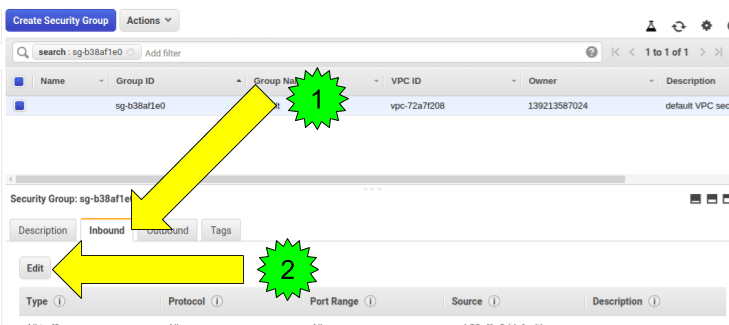
18) On the security group screen, let's put some rules about who can access your bank: (1) Locate the “Inbound” tab and then (2) click on “Edit” as shown in the image:
19) As you can see, your bank is open to be accessed only from machines belonging to the same VPC. If you want to keep this setting, you can skip directly to step 25:
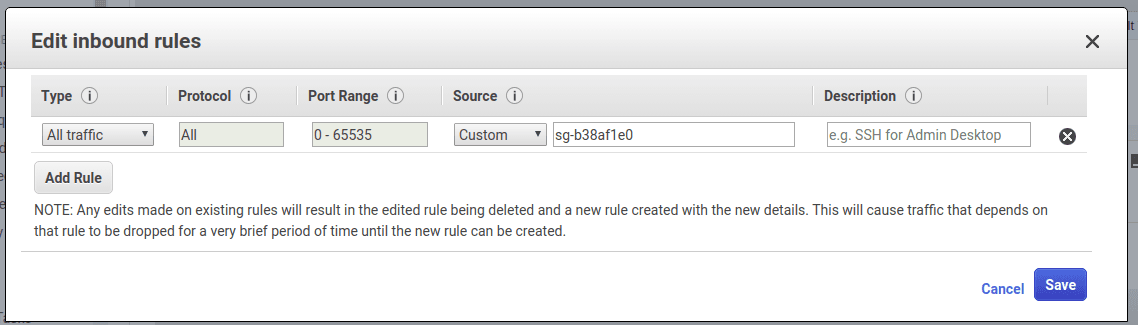
20) To withdraw the original access rule, click on the “X” to the right of the “All traffic” rule:
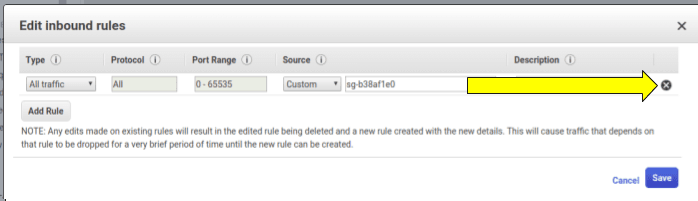
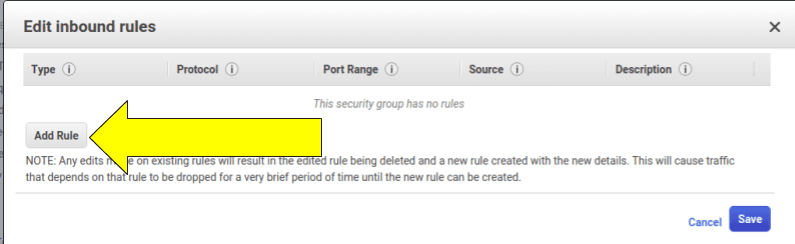
21) Add new rules by clicking on “Add Rule” as shown in the figure. A new rule must be added for each IP address you want to access your database:
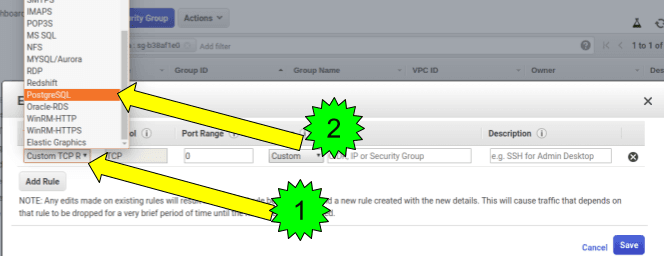
22) To add a new rule, you must select the correct port (5432 in the case of Postgres) in the “Type” column as shown in the image below:

24) After you put all the addresses you want click on “Save”.
25) Go back to the RDS home page (as per step 2) and select your database as per step 16.
26) Your database is created! On the “Connectivity & security” page, you will find the address (host) of your database. Username, password and database name were filled in in steps 7 and 14:

To enter your destination on Kondado, pay attention to the information below:
- Your database address (host) can be found on the “Connectivity & security” page, as shown in the image above (step 26);
- The user and password fields are the information entered in step 7 of this tutorial (“Master Username” and “Master Password”);
- The database field must be filled in with the information entered in the “Initial Database Name” field in step 14 of this tutorial.
Configurar o Dashboard RD Station Marketing no Power BI
Siga estes passos para integrar seus dados do RD Station Marketing ao template de dashboard no Power BI da Kondado.
Crie sua conta na Kondado
Acesse app.kondado.com.br/signup e crie uma conta para começar a configurar integrações.
Autorize o conector do RD Station Marketing
Na seção de conectores, selecione RD Station Marketing e autorize o acesso da Kondado à sua conta.
Crie as integrações necessárias
Configure as integrações de Leads, Funil, Eventos de conversão e Campanhas de e-mail. Ajuste o savepoint quando precisar trazer histórico.
Selecione o template do Dashboard no Power BI
Em 'Criar+' > Dashboards, escolha o template Dashboard RD Station Marketing no Power BI e aguarde a execução das integrações.
Acesse e personalize o dashboard
Você receberá o link por e-mail. Abra no Power BI Desktop, ajuste filtros e visuais, e compartilhe com sua equipe.