Creating the data source
Adding the connector
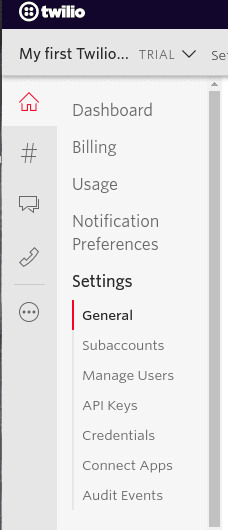
1) Log in to your Twilio account with a user that has administrator permissions
2) On the left-side menu, click Dashboard > Settings > General
3) Find the "API Credentials" > "LIVE Credentials" section and copy the "Account SID" and "Auth Token" values

4) Log in to Kondado, go to the add connectors page and select the Twilio connector
5) In the connector, under "Name" give your connector a name and, under "Account SID" and "Auth Token", paste the values obtained in step (3)
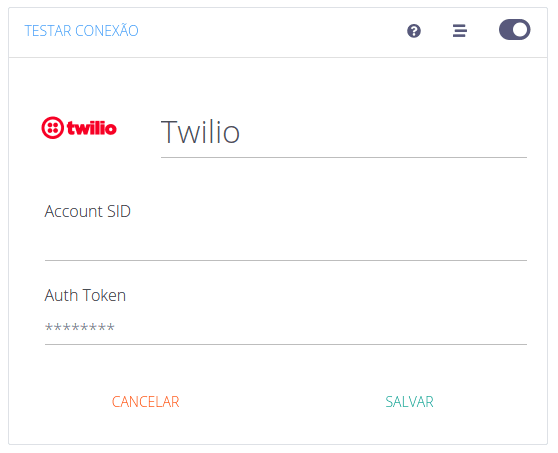
Now just click SAVE to start receiving Twilio data in your Data Warehouse or Data Lake
Pipelines
Summary
Relationship chart
Click to expand

Messages
Replication type: Incremental with update window
Parameters:
- Read start date (Savepoint): Start date for the data replication
- Update window (hours): How many hours previous to the message creation date can it still be updated?
Twilio messages with content, timestamps, status, and billing attributes.
| Campo | Tipo | |
|---|---|---|
|
text |
[en] Unique identifier for the message resource. |
|
|
text |
[en] Account SID that originated the message. |
|
|
text |
[en] Message body text kept for up to 30 days (maximum 1,600 characters). |
|
|
timestamp |
[en] UTC timestamp when the message record was created. |
|
|
timestamp |
[en] UTC timestamp when the message was sent (outbound) or received and forwarded to your system (inbound). |
|
|
timestamp |
[en] Most recent UTC timestamp when any message attribute changed. |
|
|
text |
[en] Direction indicator (e.g., inbound, outbound triggered by automation, outbound during a call, outbound reply). |
|
|
text |
[en] Numeric code returned when status is failed or undelivered (empty if successful). |
|
|
text |
[en] Description associated with error_code when delivery fails (empty if successful). |
|
|
text |
[en] Originating E.164 number, alphanumeric sender ID, or SIM that initiated the message (retained for up to 120 days). |
|
|
text |
[en] Messaging Service SID used for the message (null when not applied). |
|
|
float |
[en] Number of media files attached to the message (maximum of 10). |
|
|
float |
[en] Number of SMS segments that compose the full message (0 when not applicable). |
|
|
float |
[en] Amount charged for the message in the currency defined by price_unit (populated after send). |
|
|
text |
[en] ISO 4217 currency code used in price. |
|
|
text |
[en] Current message status (accepted, queued, sending, sent, failed, delivered, undelivered, receiving, received, read, etc.). |
|
|
text |
[en] E.164 destination number held for up to 120 days; for inbound traffic it represents the sender. |
Notes
- Part of this documentation was automatically generated by AI and may contain errors. We recommend verifying critical information
Add Twilio as a Data Source on Kondado
Connect your Twilio account to Kondado by extracting API credentials and configuring the source for pipeline creation.
Log in to Twilio with admin permissions
Access your Twilio account using a user that has administrator permissions to ensure you can view API credentials.
Navigate to API Credentials in Settings
On the left side menu, go to Dashboard > Settings > General and locate the "API Credentials" > "LIVE Credentials" section.
Copy Account SID and Auth Token
Copy the "Account SID" and "Auth Token" values from the LIVE Credentials section—these are required for authentication on Kondado.
Add Twilio source on Kondado platform
On the Kondado platform, go to the add new sources page and select the Twilio data source connector.
Configure and save the data source
Enter a name for your data source, paste the Account SID and Auth Token values, then click SAVE.
Create pipelines to your destination
Start building data pipelines to replicate Twilio data to your Data Warehouse, Data Lake, or other destinations.