How to Change Savepoint in Bulk and Load More Data
Need to load older historical data into your dashboards? This guide shows you how to change the savepoint of multiple pipelines at once and run them to expand the data window available in your dashboards.
What is a savepoint? It's the incremental extraction marker of your pipeline — it indicates from which date data will be fetched. For a detailed explanation, see Savepoint and Reprocessing — How It Works.
Step 1 — Select multiple pipelines
- In the side menu, click Pipelines.
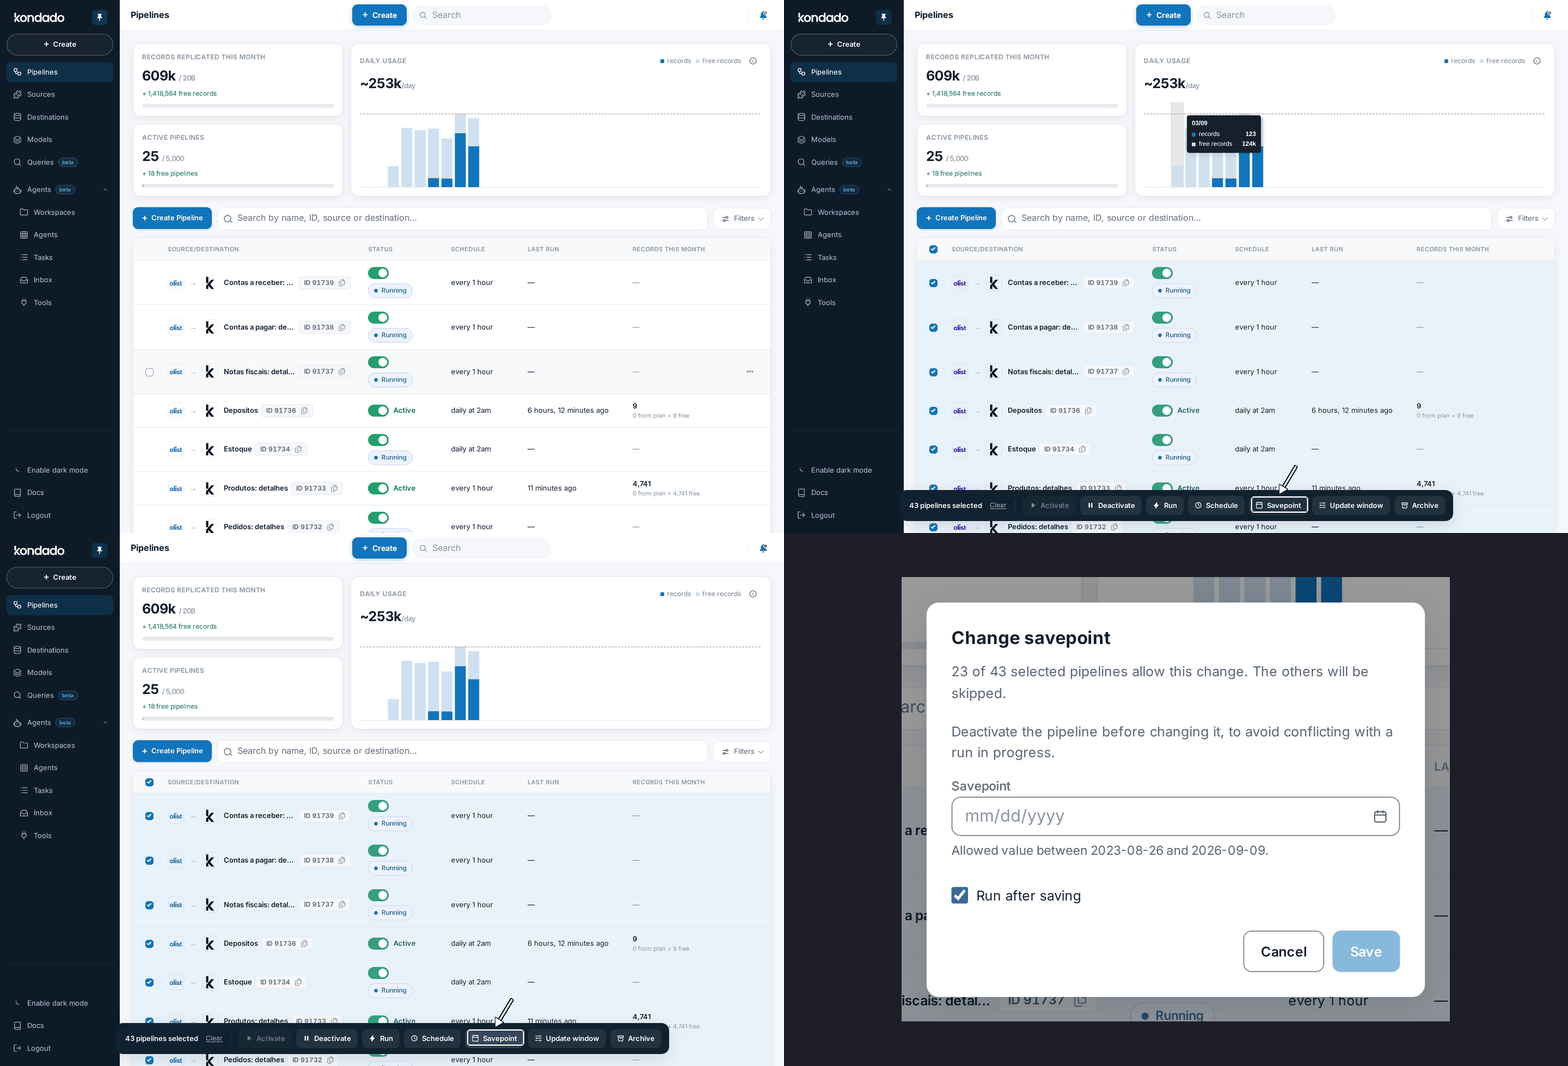
- Hover over a pipeline to reveal the checkbox on the left side of the row.
- Click the checkbox of each pipeline you want to change.
Selection shortcuts: * Select all: Click the checkbox in the table header to select all visible pipelines (applied filters are respected — "Select all" only selects what's currently displayed). * Range selection: Hold Shift and click another checkbox to select all pipelines between the two, in the order displayed in the list.
Tip: Select only incremental pipelines (see the list by source) — full-load pipelines reload all data on every execution and do not use a savepoint. Not all incremental pipelines support savepoint editing; those that don't will be automatically skipped (see Step 2). You can safely select all pipelines — the platform automatically excludes full-load pipelines from the change.
Step 2 — Change the savepoint in bulk
When you select one or more pipelines, a floating action bar (dark pill) appears at the bottom of the screen with the available actions: Activate · Deactivate · Run · Schedule · Savepoint · Update window · Archive.
- In the floating action bar, click Savepoint.
- The "Change savepoint" modal opens.
Understanding the modal:
- Eligibility: If not all selected pipelines support savepoint editing, the modal displays a message like "X of Y selected pipelines allow this change. The rest will be skipped." This is normal — only incremental pipelines with a date-type savepoint are editable.
- Warning: The modal recommends deactivating the pipeline before changing the savepoint, to avoid conflicts with an ongoing execution.
- Savepoint field: Enter the desired date in dd/mm/yyyy format or use the calendar icon. The allowed date range is shown based on the selected pipelines.
- "Run after saving": This checkbox is checked by default. Keep it checked so pipelines run automatically after the savepoint is saved. If none of the eligible pipelines are active, this checkbox will be disabled.
- Click Save.
Warning: Setting the savepoint to a much older date may result in long-running executions, higher record consumption on your plan, and possible API throttling from the data source (e.g. Bling at 3 req/s). For details, see Savepoint Reset — When It Happens and How to Avoid.
Step 3 — Run the pipelines
If you kept "Run after saving" checked in Step 2, your pipelines are already running automatically. Skip to "Monitoring the load" below.
To run manually:
- Select the desired pipelines again using the checkboxes.
- In the floating action bar, click Run.
Monitoring the load:
After execution, historical data from the new savepoint date onward will be loaded into your destination and become available in your dashboard. You can track progress in each pipeline's notification tray.
Loading time: Depends on data volume and source API limitations. Some examples:
Meta Ads: Allows up to 37 months of historical data. A full load may take several hours.
Bling / Tiny ERP: Have rate limiting (3 req/s on Bling) — large loads may take several hours.
Google Analytics 4: Daily API quotas may limit extraction speed.
Which pipelines to select by dashboard
Each dashboard template creates a small, fixed set of pipelines. Only some of them are incremental — they track where they left off and accept date changes. The rest reload all data on every execution and do not appear in the bulk savepoint change screen.
The table below lists, for each dashboard, exactly which pipelines to select.
| Dashboard | Pipelines to select (incremental) |
|---|---|
| Olist Tiny v3 Dashboard | Orders: details · Products: details |
| Olist Tiny Looker Studio Dashboard | Order details |
| RD Station CRM Dashboard | Deals · Tasks |
| VTEX Dashboard / VTEX Report | Orders: details · Orders: items · Orders: shipping data |
| Bling Dashboard | Sales orders: details |
| Instagram (organic) Dashboard | Posts · Post statistics · Daily profile statistics |
| Mercado Libre Dashboard | Mercado Libre: Ads (Anuncios) · Mercado Libre: Ads (Campaigns) · Orders · Orders: items · Orders: shipments · Orders: payment |
| RD Station MKT Dashboard | Contacts: opportunity events · Contacts: conversion events · Email campaign statistics |
| Google Ads Dashboard | Custom report |
| Facebook Ads Dashboard | Campaign performance |
| Google Ads & Facebook Ads Dashboard | Custom report · Campaign performance |
| Conta Azul Dashboard | Accounts payable · Accounts receivable · Accounts payable: categories · Accounts receivable: categories · Accounts payable: cost centers · Accounts receivable: cost centers |
| Omie Dashboard | Customers and suppliers · Financial transactions · Accounts payable: entries · Accounts receivable: entries |
Important notes:
- The remaining pipelines created by the template reload all data on every execution — that is why they have no date to change and do not appear in the selection list.
- Olist Tiny has two different dashboards: v3 uses the newer connection (2 incremental pipelines); the previous version has only 1. Check which template you use before following the list.
- Select the entire group: in Mercado Libre, VTEX, and Conta Azul, the dashboard uses Orders together with Orders: items, Orders: shipments, etc. If you change the date for one but not the others, the dashboard will show misaligned data. Select all incremental pipelines for your dashboard at once.
- If you created additional pipelines beyond the template, they may appear in the selection as well — select only those that appear enabled.
Related Articles
- Savepoint and Reprocessing — How It Works — What is a savepoint, replication types, and when to change it
- Savepoint Reset — When It Happens and How to Avoid Mass Reprocessing — Actions that reset the savepoint and how to avoid unintended reprocessing
- How to connect your data to the Kondado Dashboard template — Onboarding flow with dashboards
How to change savepoint in bulk and load more data
Step-by-step guide to changing the savepoint of multiple pipelines at once in Kondado.
Select multiple pipelines
In the side menu, click Pipelines. Hover over a pipeline to reveal the checkbox. Click the checkbox of each pipeline you want to change.
Change the savepoint in bulk
In the floating action bar, click Savepoint. In the modal, enter the desired date and keep 'Run after saving' checked. Click Save.
Run the pipelines
If you kept 'Run after saving' checked, pipelines are already running. Track progress in each pipeline's notification tray.